Lesson I: Sea Chanteys Download [PDF]
“A good song was worth ten men on a rope.”
Note to teachers: You can purchase a copy of this CD by calling the Education Office at (415) 292-6664 or listen online here
Purpose:
We encourage your class to learn several of the sea chanteys in this section before your voyage. Over the course of the voyage you will have the opportunity to sing chanteys as you are doing work. If you learn only one sea chantey, please learn “Leave Her Johnny Leave Her,” which your class will sing as you leave the ship.
In addition to learning and singing chanteys, you might map the places mentioned in the lyrics and talk about the distances that sailors traveled, or you might try to write your own modern-day chantey (for cleaning your room? Doing the dishes? Taking care of your baby sister?).
CA State Standards:
Gr. 4: VPA 2.1, 3.1, 3.3.
Gr. 5: VPA 2.1, 3.1, 3.3.
Materials:
CD and CD player or computer with speakers and Internet access,
Copies of the chantey lyrics you will be learning (see lyrics at the end of this lesson).
Introduction: (10 minutes)
Before you introduce the lesson, let students hear one or more of the chanteys you’ll be learning together. Perhaps it will be playing as the students walk into the room or transition from another activity. You can either play a chantey from the CD (see note above) or from the Internet.
Once the students have heard the chantey/s, ask them what they noticed about the music they just heard. Brainstorm a list on the board. If students haven’t already guessed, you can add the title “Sea Chanteys” to the list they have brainstormed.
Background: (10 minutes)
Using the following background information, give your class some context for the traditional songs they will be learning.
To the sailor, a chantey was as much a part of the tools used on a ship as a capstan, heaving line, or a block and tackle. Just a century ago, the hard and heavy work was done by people, not by machines. Chanteys were used to make these jobs easier. Jobs like raising sail or weighing anchor were too hard for one person to do. The only way to accomplish the job was for many sailors to work together. Chanteys helped the sailors to do just that. Chanteys coordinated the work by getting 10 or 20 sailors, or the entire crew to work together rhythmically. This made the work more efficient and easier for everyone. Having the best voice did not always make you the best chantey man (lead singer). The most popular chantey men were those who knew the most songs and who could improvise, changing the words and rhythms to fit the task or the crew.
And what did the sailors sing about? They sang about things they knew. They sang about their homes and loved ones, past experiences, their ship and crew, the ports they visited and what they would rather be doing than hauling on a line!
There are four main types of chanteys. Each is suited to a different type of shipboard task. You can tell the types apart by their rhythms. The rhythm for each type of chantey fits the purpose for which the chantey was used.
The Halyard chanteys were used to haul up the heavy yards and sails. The crew would haul only on the chorus and then only on one or two specific words. This gave them a chance to rest in between hauls.
A Short Haul chantey was sung when only a few short pulls on a line were needed. The sailors usually pulled only on the last word in the line.
The Capstan chanteys were sung during continuous activities, such as weighing anchor (raising the anchor) or loading and unloading cargo. They sounded like marching songs, because that is what the sailors were doing: marching around a capstan. *
Fo’c’sle chanteys were sung in the forecastle (Fo’c’sle) during the sailors’ leisure time. These songs usually told stories. They were rarely used for work because they did not have a strong enough rhythm.
*A capstan is a barrel shaped device. Long oak bars, known as capstan bars, were fitted into slots around the capstan, like spokes of a wheel. Men would walk around the capstan, pushing against the bars. This would make the capstan turn. As the capstan turned, the line attached to it would wind around the center, thus raising whatever was attached to the end of the line.
Learning the Chanteys: (10-20 minutes each day, until you learn them!)
Some teachers have asked each crew to learn a chantey and then to teach that chantey to the class. Others learn the chanteys together. Either way, repetition is the key.
Closing: (3 minutes)
Ask students to grade themselves as a group each day on their performance—you might even assess several categories such as volume, memorization, and melody. Keep practicing until everybody agrees that the class has deserves an “A” in each category!
Extension:
Have each crew make up a new verse to one of the chanteys. You can have them all make up verses to the same one, or let them pick which chantey they want to make up a verse to. The verse should be something that they can sing on the trip, so make sure that it is time-period appropriate! Students can perform for the class and teach other crews their verse as well.
Away for Rio -This song was used as a capstan or windlass chantey, usually for taking in the anchor. I t was often the first song sung as the ship was getting underway, which is reflected in the lyrics. You can picture the sailors’ lady friends standing on the pier listening as the sailors sing “Goodbye to all of you ladies of town...” The Rio Grande they are singing about was not the river in Mexico, but the "Rio Grande do Sul" in Brazil.
1. Away for Rio
Well a ship went to sailing over the bar Away for Rio She’s pointing her bow towards the Southern star and we’re bound for the Rio Grand
CHORUS (And it’s) Away, boys, away, Away for Rio Sing fare-thee-well my Frisco girl and we’re bound for the Rio Grande
Well now, heave with a will boys heave with a song Away for Rio And we’ll sing the chorus for it is a good song
CHORUS (And it’s) Away, boys, away, Away for Rio Sing fare-thee-well my Frisco girl and we’re bound for the Rio Grande
Now the anchor’s on board and the sails are all set Away for Rio The girls we are leaving, we’ll never forget And we’re bound for the Rio Grande
CHORUS (And it’s) Away, boys, away, Away for Rio Sing fare-thee-well my Frisco girl and we’re bound for the Rio Grande
We’re a jolly good ship with a jolly good crew Away for Rio We can stick to the coast though we’re danged/lost if we do And we’re bound for the Rio Grande
CHORUS (And it’s) Away, boys, away, Away for Rio Sing fare-thee-well my Frisco girl and we’re bound for the Rio Grande
Well it’s good by to Sally and good by to Sue Away for Rio And It’s good by to all of you flash packets*, too And we’re bound for the Rio Grande
CHORUS (And it’s) Away, boys, away, Away for Rio Sing fare-thee-well my Frisco girl and we’re bound for the Rio Grande
And it’s good by to all of you ladies of town Away for Rio We’ve left you enough for to buy a silk gown
And we’re bound for the Rio Grande
CHORUS (And it’s) Away, boys, away, Away for Rio Sing fare-thee-well my Frisco girl and we’re bound for the Rio Grande
*Packet – very fast type of sailing ship used to carry mail.
John Kanaka -This was a “long haul” chantey, used at the halyards for hoisting up the sails. Many Hawaiians worked aboard ships that sailed the Pacific, and were renowned for their excellent seamanship. English-speaking sailors often had difficulty pronouncing their names, however and so called them by the Hawaiian name "Kanaka," which means "Hawaiian Man." The lyrics "tu lai-e" also come from the Hawaiian language, and are a remnant of the chantey singing tradition of combining the music and language of different seafaring cultures.
2. John Kanaka
I thought I heard the First Mate say John Kanaka naka, tulaie You’ll work tomorrow, but not today John Kanaka naka, tulai e
CHORUS tulai e, oh, tulai e, oh John Kanaka naka, tulai e,
I thought I heard the old man say John Kanaka naka, tulai e Today, today is a sailing day John Kanaka naka, tulai e
CHORUS tulai e, oh, tulai e, oh John Kanaka naka, tulai e,
We’re outward bound from Frisco Bay John Kanaka naka, tulai e We’re outward bound at the break of day John Kanaka naka, tulai e
CHORUS tulai e, oh, tulai e, oh John Kanaka naka, tulai e,
It’s rotten meat and weevily bread John Kanaka naka, tulai e In two months out you wish you were dead John Kanaka naka, tulai e
CHORUS tulai e, oh, tulai e, oh John Kanaka naka, tulai e,
I thought I heard the Bosun say John Kanaka naka, tulai e It’s one more pull and then belay John Kanaka naka, tulai e
(Make up your own verses…)
Paddy Lay Back -This call-and -response chantey was usually sung at the capstan. A skilled chantey man could make up lyrics on the spot, altering the song to be about the crew and the adventures of their particular ship. The lyric "Take a turn around the capstan, heave a pawl refers to the "pawls’ that were hinged metal pieces at the base of a capstan. They would prevent the capstan from spinning backwards by settling into a series of holes around the capstan's base.
3. Paddy, Lay Back
It was a cold and dreary morning in December (December) and all of me money it was spent (spent, spent) Where it went to, I can’t remember (remember) so down to the shipping office I went (off I went)
CHORUSPaddy lay back, (Paddy lay back) take in your slack (take in your slack) take a turn around your capstan heave a pawl. About ship’s stations, boys be handy (Handy!) We’re bound for Valparaiso ‘round the horn
Well it seems there was a great demand for sailors (for sailors) For the colonies, and for Frisco and for France (France, France) Well, I shipped aboard the limey barque the Hotspur (the Hotspur) and got paralytic drunk on my advance (my ad-vance)
CHORUSPaddy lay back, (Paddy lay back) take in your slack (take in your slack) take a turn around your capstan heave a pawl. About ship’s stations, boys be handy (Handy!) We’re bound for Valparaiso ‘round the horn
Well, I joined her on a cold December morning (morning) a-flapping of me flippers to keep me warm (keep me warm) With the south cone hoisted as a warning (a warning) to stand by the coming of a storm
CHORUSPaddy lay back, (Paddy lay back) take in your slack (take in your slack) take a turn around your capstan heave a pawl. About ship’s stations, boys be handy (Handy!) We’re bound for Valparaiso ‘round the horn
Well, I woke up in the morning stiff and sore (sore) and I knew that I was outward bound again (bound again) and a voice come a-bawling at the door (door) Lay aft men, and answer to your name (to your name)
CHORUSPaddy lay back, (Paddy lay back) take in your slack (take in your slack) take a turn around your capstan heave a pawl. About ship’s stations, boys be handy (Handy!) We’re bound for Valparaiso ‘round the horn
Now it was on the quarter deck when first I seen ‘em (seen ‘em) such an ugly bunch I never seen before (seen before) cause there was a bum and stiff from every quarter (quarter) and it made my poor old heart feel sick and sore (sore, sore)
CHORUSPaddy lay back, (Paddy lay back) take in your slack (take in your slack) take a turn around your capstan heave a pawl. About ship’s stations, boys be handy (Handy!) We’re bound for Valparaiso ‘round the horn
(Alabama) John Cherokee -This is another halyard chantey. The type of rhythm and the lyrical content indicate that slaves in the West Indies or in the Gulf states originally sang this song. In fact, when John Cherokee is referred to as an "Indian man," it probably means he was from the West Indies. Sailors might have learned the song from freed slaves who joined the ship's crew or from black waterfront workers in the Southern states. It depicts the brutal treatment that many men faced at the hands of the captains and mates.
4. Alabama John Cherokee
Well, this is a story of John Cherokee Alabama John Cherokee He was an Indian man from Miramashi Alabama John Cherokee CHORUS waayy haay oh Alabama John Cherokee
Now John Cherokee was an Indian man Alabama John Cherokee They made him a slave down in Alabam’ Alabama John Cherokee CHORUS waayy haay oh Alabama John Cherokee
Well, they put him aboard a whaling ship Alabama John Cherokee And again and again he gave them the slip Alabama John Cherokee CHORUS waayy haay oh Alabama John Cherokee
Well, they caught him again and they chained him tight Alabama John Cherokee And they put him in the hold without any light Alabama John Cherokee CHORUS waayy haay oh Alabama John Cherokee
He had nothing to eat and nothing to drink Alabama John Cherokee Until his bones began to clink Alabama John Cherokee CHORUS waayy haay oh Alabama John Cherokee
Gave him nothing to eat and nothing to drink Alabama John Cherokee Until he dropped dead at the Captain’s feet Alabama John Cherokee CHORUS waayy haay oh Alabama John Cherokee
And now his ghost, it can be seen Alabama John Cherokee Sitting on the main truck, all slimy and green Alabama John Cherokee CHORUS waayy haay oh Alabama John Cherokee
At the break of dawn he goes below Alabama John Cherokee And that is when the rooster crows Alabama John Cherokee
CHORUS waayy haay oh Alabama John Cherokee
Roll the Old Chariot -This is another chantey that originated as an African -American spiritual. It was often used as a "stamp-and-go" or a "walk away" chantey, meaning the sailors would hold on to the line and walk with it, creating a steady pull. This was used on the ship's braces, which swing the yards around. It was also used at the Downtown Pumps, the giant flywheels which resemble the wheels of a chariot. The song was also popular on shore, and has been used as a Salvation Army hymn and a "pep song" at baseball games.
6. Roll the Old Chariot Along
And a drop of Nelson’s blood wouldn’t do us any harm, a drop of Nelson’s blood wouldn’t do us any harm, a drop of Nelson’s blood wouldn’t do us any harm, and we’ll all hang on behind
CHORUS And, we’ll roll the old chariot along, we’ll roll the old chariot along, we’ll roll the old chariot along and we’ll all hang on behind
And a plate of Irish stew wouldn’t do us any harm, And a plate of Irish stew wouldn’t do us any harm, And a plate of Irish stew wouldn’t do us any harm, and we’ll all hang on behind
CHORUS And, we’ll roll the old chariot along, we’ll roll the old chariot along, we’ll roll the old chariot along and we’ll all hang on behind
Oh, a nice fat cook wouldn’t do us any harm…
CHORUS And, we’ll roll the old chariot along, we’ll roll the old chariot along, we’ll roll the old chariot along and we’ll all hang on behind
Oh, a nice watch below wouldn’t do us any harm…
CHORUS And, we’ll roll the old chariot along, we’ll roll the old chariot along, we’ll roll the old chariot along and we’ll all hang on behind
Oh, a good night ashore wouldn’t do us any harm…
CHORUS And, we’ll roll the old chariot along, we’ll roll the old chariot along, we’ll roll the old chariot along and we’ll all hang on behind
Make up your own verses!
Strike the Bell -The lyrics of this tune refer to the practice of keeping "Bell Time." The sailor's workday was divided into shifts of 4 hours on duty and 4 hours off. Every half-hour the mate would mark the time by ringing the ship's bell, adding one more strike with each half hour. This culmi-nated after four hours with eight bells being rung, signaling the shift change, a moment the sailors waited for enthusiastically. This was the sailor's version of a 19th century music hall song called "Ring the Bell Watchman," by Henry C. Work, a popular song writer of the time.
9. Strike the Bell
Up on the poop deck, walking all about there stands the 2nd mate, so sturdy and so stout what he is a’thinking, he don’t know himself and we wish that he would hurry up and strike, strike the bell
CHORUS strike the bell 2nd mate and let us go below look well to windward, you can see its going to blow looking at the glass, you can see that it fell and we wish that you would hurry up and strike, strike the bell
Down on the main deck, working on the pumps is the poor larboard watch wishing for their bunk looking out to windward you can see a mighty swell and we wish that you would hurry up and strike, strike the bell
CHORUS strike the bell 2nd mate and let us go below look well to windward, you can see its going to blow looking at the glass, you can see that it fell and we wish that you would hurry up and strike, strike the bell
Down in the wheelhouse, Old Anderson stands grasping at the helm with his frost bitten hands looking cockeyed at the compass, but the course is clear as, ...well.. and we wish that you would hurry up and strike, strike the bell
CHORUS strike the bell 2nd mate and let us go below look well to windward, you can see its going to blow looking at the glass, you can see that it fell and we wish that you would hurry up and strike, strike the bell
Well, down in his cabin, our gallant captain stands looking out the transom with a spyglass in his hands what he is a-thinking, we all know very well he’s thinking more to shorten sail then striking the bell
CHORUS strike the bell 2nd mate and let us go below look well to windward, you can see its going to blow looking at the glass, you can see that it fell and we wish that you would hurry up and strike, strike the bell
Sally Rackett (Haul 'er Away) -This is a short haul chantey, meaning the crew would pull one time on the chorus. The pull came on the word "Haul.' The song is said to be from Jamaica or Barbados.
10. Sally Rackett
oh, little Sally Rackett haul ‘er away
she shipped aboard a packet haul ‘er away
and she never did regret it haul ‘er away
oh, holly -hi-o haul ‘er away
Oh, little Patty Baker haul ‘er away
She ran off with the Quaker haul ‘er away
cause her mom couldn’t shake her haul ‘er away
oh, holly -hi-o haul ‘er away
Oh, little Fluffanana haul ‘er away
she slept on a banana haul ‘er away
now she can’t play the piana haul ‘er away
oh, holly -hi-o haul ‘er away
Oh, little Kitty Carson haul ‘er away
she ran off with the parson haul ‘er away
oh, so says our old bosun haul ‘er away
oh, holly -hi-o haul ‘er away
Leave Her Johnny -This was, traditionally, the last chantey the crew would sing before disem-barking. It was used when warping (pulling) the ship into the pier, or when pumping the bilges for the last time. Although it at first sounds like the crew is sentimental about leaving the ship, the lyrics describe the horrible conditions that they suffered through during the voyage. Since it was the 1ast song of the journey, the sailors took the opportunity to vent their feelings about how they were treated without fear of reprisal.
12. Leave Her, Johnny
Oh, the times were hard and the wages low, leave her, Johnny, leave her.
And now ashore we must go, and it’s time for us to leave her
CHORUS Oh! Leave her, Johnny, leave her, Oh, leave her, Johnny, leave her, for the voyage is done and the winds don’t blow, and it’s time for us to leave her
Well there’s no more voyages around cape horn, Leave her, Johnny, leave her,
Where you know the weather’s never warm, and it’s time for us to leave her
CHORUS Oh! Leave her, Johnny, leave her, Oh, leave her, Johnny, leave her, for the voyage is done and the winds don’t blow, and it’s time for us to leave her
We ate rotten meat and weevely bread, leave her, Johnny, leave her,
And it was pump or drown the old man said, and its time for us to leave her
CHORUS Oh! Leave her, Johnny, leave her, Oh, leave her, Johnny, leave her, for the voyage is done and the winds don’t blow, and it’s time for us to leave her
I thought I heard the first mate say, leave her, Johnny, leave her,
Tomorrow you will get your pay, and its time for us to leave her
CHORUS Oh! Leave her, Johnny, leave her, Oh, leave her, Johnny, leave her, for the voyage is done and the winds don’t blow, and it’s time for us to leave her
Now the rats have gone and we the crew, leave her, Johnny, leave her,
Why now ashore we’ll go, too, and its time for us to leave her
CHORUS Leave her, Johnny, leave her, Oh, leave her, Johnny, leave her, for the voyage is done and the winds don’t blow, and it’s time for us to leave her
CHORUS Leave her, Johnny, leave her, Oh, leave her, Johnny, leave her, for the voyage is done and the winds don’t blow, and it’s time for us to leave her
Purpose:
The language used aboard a ship can feel foreign at first. We use the nautical terminology precisely and accurately not only for authenticity, but also to promote safety. Our extensive use of nautical language also adds an important layer to the challenge ahead of your students.
If students are comfortable with some of the language we will be using, they will be more comfortable with the work. We will also be able to get farther together.
It may be helpful to explain to your students the origins of some of the terms. You can find many word origins by looking them up online or in a nautical dictionary, but there are some general notes about nautical terms that are good to keep in mind.
1. Sailing ships tended to be international places, many nautical terms come from different languages and there is a predominance of Northern European and Scandinavian roots.
2. Many words are pronounced differently than they appear or are shortened for convenience.
3. Many terms are compound words, often shortened for convenience.
The vocabulary below encompasses the terms that all students in your class should know. There are a few additional specialized terms in the Crew Packets (see lesson VI) that each student should learn. You can use the lesson suggested below or any other vocabulary activities that work for your class.
Materials:
Vocabulary lists (see below)
Diagrams (See below)
Introduction (5 minutes)
Call your lads to attention with some salty language: “Ahoy, lads!” Ask students to brainstorm any nautical terminology they already know. Then explain the purpose of learning accurate terms (see above). Remind the students that they will all need to know these terms to complete their voyage successfully!
Activity: (30-45 minutes)
Students might work best on this project in groups of three.
Display the vocabulary words without definitions (write them on the board, post them on the wall, or put them on an overhead. Ask students to volunteer definitions for any terms they already know. Name a term or two nobody knows and ask for guesses.
Pass out a copy of the vocabulary to each group with definitions and pass out the [insert #] diagrams provided below. Ask students to label the diagrams using the words on the list. Remind them that they have resources: each other’s knowledge, the definitions on the page, and dictionaries.
(Note: if you put one of each group’s diagrams on over head transparencies rather than paper, students can display their work for the whole class during the review).
Closing: (10 –15 minutes)
Review the diagrams and answer any questions. Students may want to correct their work.
Further Practice: (Spread this work out over several days or weeks.)
Quick Draw—Divide the class into two teams, or pit crews against each other. Put all the vocabulary terms in a “hat.” A designated student from each team stands at the board and tries to represent the term visually. Whichever team guesses the word first wins the round.
Categorizing—Ask the students to cut out the words from a list you provide. Then, working in pairs if you want, ask them to invent new categories and place the words in those categories in a way that makes sense. If you like, you can create the new categories ahead of time. Categories might include: “things made out of metal/wood/rope,” “things you can touch/can’t touch,” “words you understand/need to work on,” etc. For extra practice, you might ask students to put the words back in the original categories as they are listed above.
Charades—play the classic game using words from the list.
Find pairs—some (aft and forward) are obvious; others take more work (fall line and cleat--because you cleat the line, OR hawser and bollard, OR oar and oarlock). If your students understand the words, they will find plenty (though not all the words can be easily paired).
Post the words in a way that makes sense (by category? on a diagram?) and refer to it frequently.
Note: Many of the strategies in this lesson will also be useful to crews as they learn the vocabulary specific to their work.
Verbal Commands
Ahoy
Hello
Avast!
Stop!
Aye
Yes
Aye Aye
I understand your orders and will carry them out
Carry on
I am done with my orders and expect a response
Working on Lines
Haul Away
Pull on a line, hand over hand
Slack Away
Let a line out, hand under hand
Heave (Ho)
Pull all together on command
Avast
Stop and hold on!
Up Behind
Let go of the line, get clear
Bitter End
The end of a line not attached to anything
Working end
The end of a line you haul or slack on
Standing part
The part of a line secured to the ship
Names of lines and Places to Secure lines
Bitt
Small posts fixed through the deck of the vessel for fastening lines to
Bollard
Steel posts secured to the pier used for mooring vessels
Cleat
Specially shaped piece of wood or metal used for tying off a line
Block and tackle
Pulleys rigged with a rope to provide mechanical advantage
Fall line
Line that comes from the upper block of a block and tackle, when you haul or slack it the load moves up and down
Tag line
Line that controls a load, when you haul or slack it moves the load fore, aft, port or starboard over the deck
Hawser
A large line that ties the ship to the pier
Heaving line
A lightweight line for throwing, it attaches to a hawser
Lead line
A long line with a weight on one end, marked in fathoms, used to measure the depth of the water
Parts of a Ship and other useful vocabulary
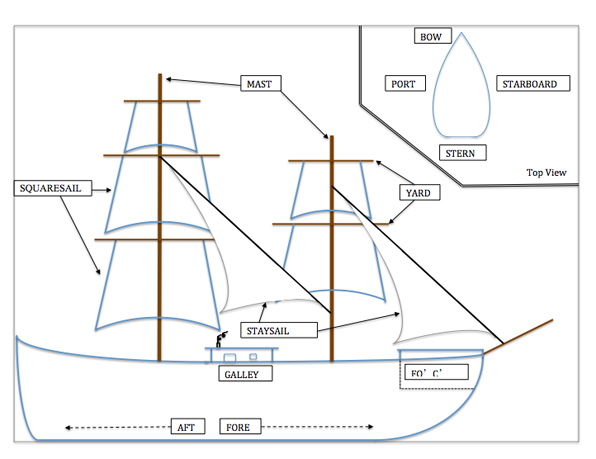
Bow
Front part of a vessel
Stern
Back part of a vessel
Port
Left side of a vessel when looking forward
Starboard
Right side of a vessel when looking forward
Fore
At or towards the bow
Aft
At or towards the stern
Davit
Used for holding a longboat over the side of a large vessel or pier
Fathom
Six feet
Forecastle
Area forward on a ship where the common sailors sleep
Galley
Kitchen on a ship
Gangway
The way to get on or off a vessel in port
Mast
Vertical spar
Square sail
Largest sails, made for sailing before the wind
Stay sail
Smaller sails used for stability and sailing into the wind
Purpose:
The language used aboard a ship can feel foreign at first. We use the nautical terminology precisely and accurately not only for authenticity, but also to promote safety. Our extensive use of nautical language also adds an important layer to the challenge ahead of your students.
If students are comfortable with some of the language we will be using, they will be more comfortable with the work. We will also be able to get farther together.
It may be helpful to explain to your students the origins of some of the terms. You can find many word origins by looking them up online or in a nautical dictionary, but there are some general notes about nautical terms that are good to keep in mind.
1. Sailing ships tended to be international places, many nautical terms come from different languages and there is a predominance of Northern European and Scandinavian roots.
2. Many words are pronounced differently than they appear or are shortened for convenience.
3. Many terms are compound words, often shortened for convenience.
The vocabulary below encompasses the terms that all students in your class should know. There are a few additional specialized terms in the Crew Packets (see lesson VI) that each student should learn. You can use the lesson suggested below or any other vocabulary activities that work for your class.
Materials:
Vocabulary lists (see below)
Computers with internet access
Introduction (5 minutes)
Call your lads to attention with some salty language: “Ahoy, lads!” Ask students to brainstorm any nautical terminology they already know. Then explain the purpose of learning accurate terms (see above). Remind the students that they will all need to know these terms to complete their voyage successfully!
Activity: (30-45 minutes)
Students might work best on this project in groups of two.
Display the vocabulary words without definitions (write them on the board, post them on the wall, or put them on an overhead. Ask students to volunteer definitions for any terms they already know. Name a term or two nobody knows and ask for guesses.
Pass out a copy of the vocabulary list to each group. Ask students to use the classroom computers to find a definition for each word on the vocabulary list. Remind them that they have resources: each other’s knowledge, nautical websites, and dictionaries.
Once students have definitions, have each pair join with another pair to compare their answers. Ask students to come up with ONE set of definitions for each group of four. They can pick one pair’s definition, the other pair’s definition, or try and combine the two.
Lastly, bring the whole class together. Go through the vocabulary list one word at a time. Ask for a few different definitions from the class, then read the definition provided on the worksheets below. Talk with the students about why there are different definitions for the same word. Make it clear that the
Closing: (10 –15 minutes)
Review the diagrams and answer any questions. Students may want to correct their work.
Further Practice: (Spread this work out over several days or weeks.)
Quick Draw—Divide the class into two teams, or pit crews against each other. Put all the vocabulary terms in a “hat.” A designated student from each team stands at the board and tries to represent the term visually. Whichever team guesses the word first wins the round.
Categorizing—Ask the students to cut out the words from a list you provide. Then, working in pairs if you want, ask them to invent new categories and place the words in those categories in a way that makes sense. If you like, you can create the new categories ahead of time. Categories might include: “things made out of metal/wood/rope,” “things you can touch/can’t touch,” “words you understand/need to work on,” etc. For extra practice, you might ask students to put the words back in the original categories as they are listed above.
Charades—play the classic game using words from the list.
Find pairs—some (aft and forward) are obvious; others take more work (fall line and cleat--because you cleat the line, OR hawser and bollard, OR oar and oarlock). If your students understand the words, they will find plenty (though not all the words can be easily paired).
Post the words in a way that makes sense (by category? on a diagram?) and refer to it frequently.
Note: Many of the strategies in this lesson will also be useful to crews as they learn the vocabulary specific to their work.
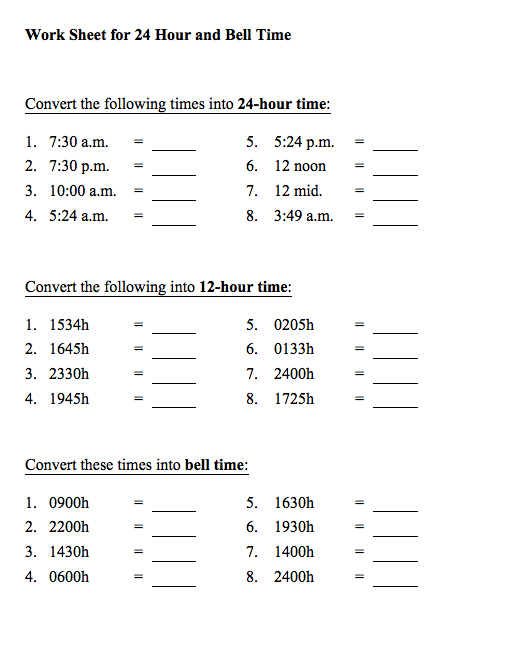
Purpose: While you are with us on the overnight voyage, you will hear a lot of references to ship’s time, also known as 24-hour time. The passage of time will be marked by the ringing the ship’s bell. You and your students will need to understand and report ship’s time. In addition to being historically accurate, using ship’ helps students to feel as if they are operating in a different world. Many students enjoy this arithmetic shift.
This lesson helps students to understand how 24-time and bell-time work. After completing several worksheets to practice, you will play a simple game with a classroom bell. Once the students have mastered the skill, you might use bell time for the rest of the day, or set aside another day to do so.
Standards:
California; Mathematical Reasoning
2.0 Students use strategies, skills, and concepts in finding solutions:
2.3 Use a variety of methods, such as words, numbers, symbols, charts, graphs, tables, diagrams, and models, to explain mathematical reasoning.
Common Core: Generate and analyze patterns.
CCSS.Math.Content.4.OA.C.5 Generate a number or shape pattern that follows a given rule. Identify apparent features of the pattern that were not explicit in the rule itself. For example, given the rule “Add 3” and the starting number 1, generate terms in the resulting sequence and observe that the terms appear to alternate between odd and even numbers. Explain informally why the numbers will continue to alternate in this way.
Use place value understanding and properties of operations to perform multi-digit arithmetic.
CCSS.Math.Content.4.NBT.B.4 Fluently add and subtract multi-digit whole numbers using the standard algorithm.
Solve problems involving measurement and conversion of measurements. CCSS.Math.Content.4.MD.A.2 Use the four operations to solve word problems involving distances, intervals of time, liquid volumes, masses of objects, and money, including problems involving simple fractions or decimals, and problems that require expressing measurements given in a larger unit in terms of a smaller unit. Represent measurement quantities using diagrams such as number line diagrams that feature a measurement scale.
Materials:
A bell or gong--any noisemaker (pot and spoon) can work! In this lesson we’ll refer to your bell as the “ship’s bell.”
Copies of:
Bell time and 24-Hour Chart
Bell time and 24-Hour Coin
Bell time and 24-Hour Worksheet (all follow this lesson)
Something with which to cover the classroom clock.
Another clock or watch to be used for telling time.
Introduction (10 minutes)
Ring the “ship’s bell” to correctly indicate the time of day (use the worksheets following this lesson to help you figure it out!) Ask students to try to guess what the ringing of the bell meant! Explain that you will be using bell-time on board the Balclutha and that the purpose of this lesson is to make sure everybody in the class understands how it works.
24-hour time (20 minutes)
Use the following information to explain 24-hour time:
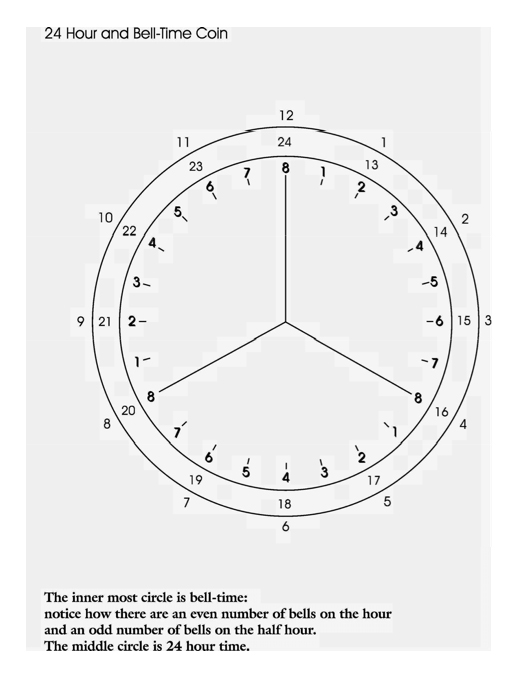
Time at sea is kept differently from time on land. For clarity’s sake, sailors use a 24-hour clock instead of a 12-hour clock. Twenty-four hour time is still used on merchant and naval ships today.
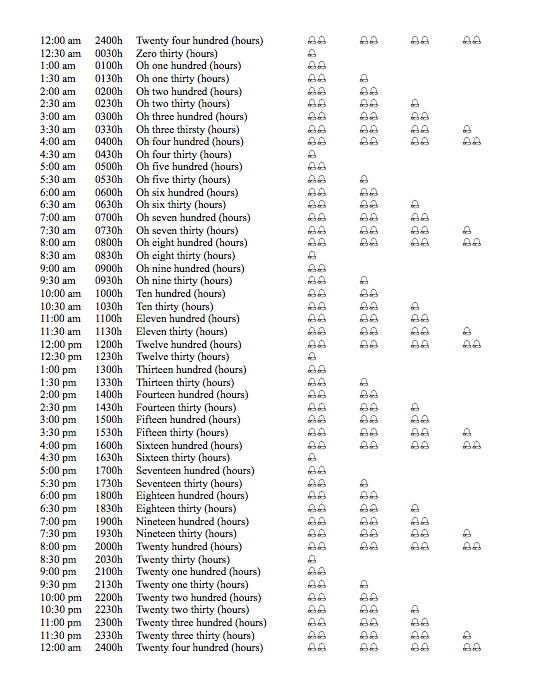
When using 24-hour time, each day begins at midnight. When written, 24-hour time has four digits. When spoken, time is expressed in “hundreds.” For example:
1:00 a.m. is written 0100 and is spoken “O-one hundred hours.”
11:00 a.m. is written 1100 and is spoken “eleven-hundred hours.”
12:00 noon is written 1200 and is spoken “twelve-hundred hours.”
2:30 p.m. is written 1430 and is spoken “fourteen-thirty hours.”
Point out that you simply add 12 hours to convert “regular” p.m. time to 24-hour time. To convert 24-hour time back to a “regular” p.m. time, subtract 12 hours.
At this point, you might pass out the “Bell time and 24-Hour Chart” that follows this lesson. Ask students to use the chart to help them complete the first two sections of the “Bell time and 24-Hour Worksheet.”
Bell-Time (20 minutes)
Use the following information to explain bell-time:
Historically, sailors had another way to tell time. In 1906, most sailors did not own watches, so time was kept by ringing the ship’s bell. Everybody on board could keep track of the time this way.
A sailor’s day was divided into 4-hour duty periods, or watches. This means that a sailor worked for four hours and then had four hours off. Bell time was structured around this four-hour watch schedule. There are six watches in a day (6x4=24), so bell time repeated its pattern six times each day. The bell time pattern started at 12:00 noon, 4:00 p.m., 8:00pm, 12:00 midnight, 4:00 a.m., and 8:00 a.m.
When keeping bell time, each bell rung equaled one half-hour. When the bell was rung on the hour, the number of strokes was even. On the half-hour, the number of strokes was odd. Bells were always rung in pairs.
At this point you can ask students to open the “Bell time and 24-Hour Chart” to see how bell-time works. Students can use the chart to help them complete the third section of the “Bell time and 24-Hour Worksheet.”
Additional Practice Ideas (at teacher’s discretion—time varies)
Use the “Bell time and 24-Hour Coin.” Call out a time (on any of the three rings) and ask students to mark it on their “coin.” Then ask students to report that time as it is represented on another ring. This can deepen students’ understanding of the relationships among the three ways of representing the passage of time.
Play house. Ring your bell to indicate what time it is. Ask students to pantomime what they are doing at that time of day. Then call for volunteers to explain what they are doing and why.
Ask students to write a very short story (one page!) using 24-hour time. The story needs to mention the time at least 5 times and should refer both to time before 1200 and after it.
Closing (5 minutes) Ring your bell again to represent the actual classroom time. Ask students what time it is and let them know it’s time to end the lesson for today, but that you will have a chance to practice it when you spend the day using only bell time. You might also suggest that students teach bell time to their families tonight.
Extension (a full or partial day)
After students have learned bell time, cover your classroom clock, ask students to cover or put away watches, cell phones, etc., and spend a day (or several) living by the bell. You might try some of the following:
Write your daily agenda in 24-hour time.
Add a few special events that will happen at certain time—a stretch break with music, for example.
Divide the job of ringing the bell by “crews”—you might choose one crew to be responsible from 8-12 and another from 12-4.
Put away your own watch—give over the only timepiece to the student in charge of the bell.
Ask students not to comment when the bell is rung (this heads of some of the distraction factor).
Have students keep a cheat-sheet handy to check if they are confused.
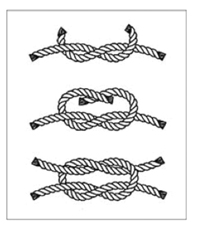
Purpose: Most of the knots we tie today are old, even ancient. Over the centuries they have been refined and perfected to fit many different needs. While on the Balclutha, you will learn several knots and belays. Some crews will learn additional knots in advance of the voyage. There are two knots the whole class must know prior to the voyage: the bowline and the square knot.
Materials:
Extra People! In this lesson it is EXTREMELY helpful to have as many knowledgeable knot-tying experts as possible. If you have parents or other adults who have experience with knots, invite them in to help with this lesson
Practice ropes (ideally, each is one-fathom, 6 feet, long and there’s one per student—but you can make do with a couple for each crew).
Images of the completed knots (see below)
Stopwatch or other clock.
Computer and internet connection (optional) for viewing youtube clip
Introduction (5-10 minutes)
Ask students what they already know about knots.
When have you or your parents tied knots? (Think about making a swing, tying something to the roof rack of your car.)
For those who have tied knots: Do you know the names of the knots you tied? What is hard about learning knots?
Who uses knots in their work? (Think about farmers, weavers, mountain climbers and rock climbers, arborists, fishermen, rescue workers, construction workers, spelunkers, truckers, and sailors!)
Explain to the class the purpose of the lesson (see above). Be sure to remind them that tying knots right is critical to their safety on the Balclutha!
At this point, if you have the time, you may want to show a short 10 min clip from the Disney movie Shipwrecked. It shows a young boy’s first few days on board a sailing ship. This link: http://www.youtube.com/watch?v=TPRbqRdCkXM&list=PL8931B2CCCFF108A8
will take you to the youtube clip, I highly recommend that you watch the clip before deciding whether or not to show it to your class. The movie is rated PG. If you can get ahold of the full-length movie, it is a fun way to spend an afternoon, but not all that educational.
Learning the knots (30+ minutes)
Introduce each of the two knots by demonstrating them for the class—if you, a student or a parent is comfortable teaching the knots, this works best. You can also use any number of Internet sites that demonstrate knot tying. One good one is www.animatedknots.com.
Students practice tying the bowline and square knot until all are comfortable with it. It makes sense to practice within crews in preparation for the knot-tying challenge.
While students are practicing, teacher and any teaching assistants circulate and help struggling students. Have students demonstrate the knot to you, if they do it correctly then have them teach other struggling students!
Note about knot tying: If students only complete this lesson once, they will not remember the knots. This is a lesson that can be repeated, with variations, if you really want the students to master the knots.
Knot-Tying Challenge (20 minutes)
Students compete in crews. This contest is designed so that every member of the crew must tie the knot, but crewmembers can help each other. This structure encourages teamwork and ensures that everyone completes the challenge.
Each crew will take a turn at the front of the class.
Each crewmember holds a rope out in front of them. The teacher (or another leader) calls out the name of a knot (either a bowline or a square knot) and the clock starts. When all the students in the group have successfully tied the knot, the clock stops. Once a student’s knot is inspected and approved by the teacher, that student can help his or her crewmates—BUT students cannot touch each others’ ropes. They must help each other by explaining what to do! When all students in a crew have successfully tied the first knot, the second knot is called.
The crew with the shortest combined time is the winner!
Closing: (1 minute)
Ask the students to teach one of these knots to someone in their families!
Name:Square Knot Use: The Square Knot is used to join two ends of line that are of similar diameter (size).
Hold one end of line in each hand
Cross the end of the line in your right hand over the one in your left hand
Wrap the ends around each other like you are tying your shoes
Now cross the line in your left hand over the line in your right hand
Wrap the ends around each other a second time
Pull tight!
Helpful hints:
Use two different colors of line, the same color goes on top both times!
Right over left (wrap around) and then left over right!
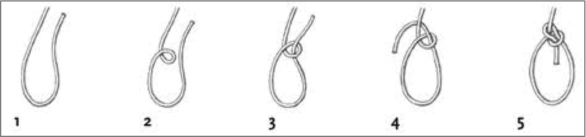
Name:Bowline (pronounced bo-lyn) Use: The Bowline is used to make a loop at the end of a line. Sometimes that loop is made to attach the end of a line to a fixed object.
Form your big loop (bight) in the end of the line. If you are tying a line to an object (like the deck ring, pictured above) the first step is to put the line through the object. Have the standing part on the left and the bitter end on the right.
Make a small loop in the standing part. Look carefully at how the line crosses itself after the small loop is formed. The part of the line laying on top should be leading towards your big loop and the part on the bottom (standing part) should be leading away from the knot.
Bring the bitter end up through the small loop from the bottom. DO NOT PULL THE LINE ALL THE WAY THROUGH! Only use enough of the bitter end to finish the knot with.
Pass the bitter end around (behind) the standing part from right to left.
Pass the bitter end back through the small loop from the top down. To tighten the knot, hold the two pieces of line in the small loop together in one hand, pull on the standing part.
“The sailor comes out of the hatch, runs around the mast, and goes back down the hatch!”
Lesson V: Introduction to Role-PlayingDownload [PDF]
Purpose:
When students board the Balclutha, they will be pretending to be “green hands.” The staff on board will also be role-playing. Role-playing asks students to move beyond their personal experience and look at the world through a different set of eyes. Developing the habit of interpreting the same events from different points of view helps history become alive and exciting.
It is important that the students are prepared for role-playing! This activity will remind students of the concept of role-play and will introduce the students to the characters they will be working with aboard the ship.
CA Content Standards:
Visual and Performing Arts – Theater
Fourth Grade 2.0 CREATIVE EXPRESSION
2.1 Demonstrate the emotional traits of a character through gesture and action.
2.2 Retell or improvise stories from classroom literature in a variety of tones (gossipy, sorrowful, comic, frightened, joyful, sarcastic). 5.0 CONNECTIONS, RELATIONSHIPS, APPLICATIONS
5.1 Dramatize events in California history.
5.2 Use improvisation and dramatization to explore concepts in other content areas.
Fifth Grade 2.0 CREATIVE EXPRESSION
2.3 Collaborate as an actor, director, scriptwriter, or technical artist in creating formal or informal theatrical performances. 5.0 CONNECTIONS, RELATIONSHIPS, APPLICATIONS
5.1 Use theatrical skills to dramatize events and concepts from other curriculum areas, such as reenacting the signing of the Declaration of Independence in history–social science.
Materials:
Copies of the Characters and Salty Situations (see below)
Props of the students’ choice (optional)
Introduction (10 minutes)
Explain to the students that during the entire time they are on Hyde Street Pier, they will be role-playing. The students will pretend to be “green” hands, which are new or inexperienced sailors. The staff on the ship will also be playing various roles, and, unless there’s an emergency, they will not step out of those roles.
You might ask students about other situations in which they’ve seen or been a part of a role-play. Ask them to consider the purpose of a role-play. Ask them to talk about what is hard about role-playing—and what is fun about it. You might even create your own role-playing guidelines: what does it take to behave, speak and think as another person?
The Characters (10 minutes)
Help your students become familiar with each of the characters they will meet on the Balclutha (see character descriptions below). Then ask students to role-play the characters in the “Salty Situations” below.
The Captain is a strict businessman. His job is to transport lumber to San Francisco to help rebuild the city after the earthquake of 1906. He demands that his crew works hard so he can turn a profit, and he rarely gives them anything that will cost him money. Never satisfied, he always thinks the sailors can do more. The captain is a well-educated man with a great deal of experience--he has spent 20 years at sea, and for 12 of those he served as captain.
After the captain, the First Mate is the best sailor on the ship. He is the quality control: he makes sure that everything is ship shape aboard the vessel and is responsible for the behavior of the crew. In order to ensure respect for himself and the captain, he is very strict. The first mate hopes someday to become the captain of his own vessel.
The “Doctor” on the Balclutha is really just the cook. He is highly superstitious and full of wild ideas, but he knows everything about the galley. He can turn dried beef and flour into an edible meal for the common sailors, and he always cooks the captain a good meal. He is in charge of the food supplies and watches them carefully. He earned his nickname because he takes care of the crew when he can and tends to sick or injured sailors.
The Second Mate is the sailor’s friend. He tries to make the Captain happy, but he often gets in trouble anyway. Unfortunately, he doesn’t always love to work. Despite his tendency toward laziness, the Captain made him an officer because of his vast experience. He knows far more about the craft of sailing than the common sailors or green hands.
Salty Situations (30 minutes – 1 hour)
There are many ways to use the “Salty Situations.”
Pair up your students. Cut out the situations and provide one to each pair of students so that they can prepare the role-plays. Then ask the pairs to perform in front of the class. Note: the last two scenarios are for groups of three.
Ask for three volunteers to come to the front of the class. Then read one of the situations aloud. After the class has an opportunity to give suggestions about how the situation might unfold, the volunteers act it out. You might ask for fresh volunteers for each of several situations.
Use the same situation several times, asking students to try out various endings.
Situations:
Characters: The First Mate and a green hand. As the moon lights the open ocean, the First Mate walks toward the bow and sees a sailor sleeping during his assigned watch.
Characters: The Second Mate and a green hand. A sailor lying in his bunk complains to the Second Mate that he is too sick to go on deck to work.
Characters: The Second Mate and a green hand. The wind is blowing very hard and there is much to do. If the crew does not get the sails in, the mast may break. All hands are working their hardest, except for one sailor who is sick in his bunk.
Characters: The “Doctor” and a green hand. The Doctor catches the green hand stealing a piece of hard tack from the galley.
Characters: Captain and the Second Mate. The second mate is sick of the lousy food full of weevils and other insects. He complains to the Captain.
Characters: The Second Mate and a green hand. The sailor is sick of the lousy food full of weevils and other insects. He complains to the Second Mate.
Characters: The Captain and a green hand. The ship is tied to a dock in Puget Sound loading lumber. In the middle of the night the Captain gets up to walk the deck and sees a sailor sneaking off the ship with his sea bag over his shoulder. What happens?
Characters: The Second Mate and a green sailor. The ship is tied to a dock in Puget Sound loading lumber. In the middle of the night the Second Mate gets up to walk the deck and sees a sailor sneaking off the ship with his sea bag over his shoulder.
Characters: The First Mate and the Second Mate. The second mate is assigned to repair some rigging aloft and says he finished the work. Then the First Mate overhears him explaining to another sailor that he didn’t do what he was supposed to do.
Characters: The Second Mate and the Captain. TheCaptain wants the lumber loaded faster and wants the Second Mate to get his watch to work harder. The sailors are already exhausted from a lot of work.
Characters: The Captain, the Doctor, and a farmer. While loading lumber in Puget Sound, a local farmer offers to trade the Balclutha enough eggs for the entire crew to have a delicious breakfast. He wants a large but fair amount of lumber in return.
Characters: The Captain and the First Mate and sailor. It’s two days before the Balclutha is set to sail north along the coast. A man asks to join the crew. He looks strong, but is unshaven and dirty.
Closing: (5-10 minutes)
You might review some of the questions you posed in the introduction:
What purposes can role-playing serve?
What’s hard about role-playing?
What’s fun about it?
What general guidelines should you follow while role-playing?