Lesson PlansLesson VI: Crew Packets Purpose: Materials: Introduction: (10 minutes) During this activity students will have a chance to learn about the specific information that they will need to know as part of their crew. Each crew will then create a short presentation to inform the rest of the class about their job on board and why it is important. It is important to note that there is more information to learn than there is to present! Explain to the students that they need to be EXPERTS on their crew’s work, but they only need to explain the basic concepts to the class. Each crew will have questions in their packet to guide them in making their presentation. Setting up the Activity: (20 minutes)
Instructions to the Class: “Make a poster-board that answers all of the Presentation Questions in your crew packet. There should be an image and a written explanation for each question. You will present your poster to the class at the end of this (lesson). You will be graded as a crew based on the rubric that I am passing out right now…” Pass out the rubric and review any information that is new to the students. If you are using a standard class presentation rubric, they should be familiar with the grading criteria. Crew Packets:
Work Time: (45 minutes) Presentations and Evaluation: (30 minutes)
Lesson VI: Using the Crew Packets Purpose: Getting ready to spend the night working aboard the Balclutha involves learning new skills and new content. Some of this knowledge will be needed by everyone in the class. You have already found much of this material in Lessons I-V of this section.But some of the new knowledge needs only be learned by members of a particular crew. At this point, you should have already divided your class into five crews: Boat Crew, Deckhand Crew, Rigger Crew, Galley Crew, and Bosun Crew. Each crew has a specialized packet that contains material only they need to know. The packets also contain some material that everyone needs to know, but which is best reviewed in the smaller crew groups.Each crew is responsible for the material in its crew packet! This lesson plan outlines one possible way to introduce each crew to their crew packet.Materials:
Introduction (5 minutes) Icebreaker (10-15 minutes)
Introduction of Crew Packets (30 minutes)
Vocabulary Lookup & Knot Tying (15-20 minutes) Closing: (5-10 minutes)Use this opportunity to answer any questions the students came up with about the voyage or their work in crews.
Follow Up Lessons:
BOAT CREW Roles:
Presentation Questions:
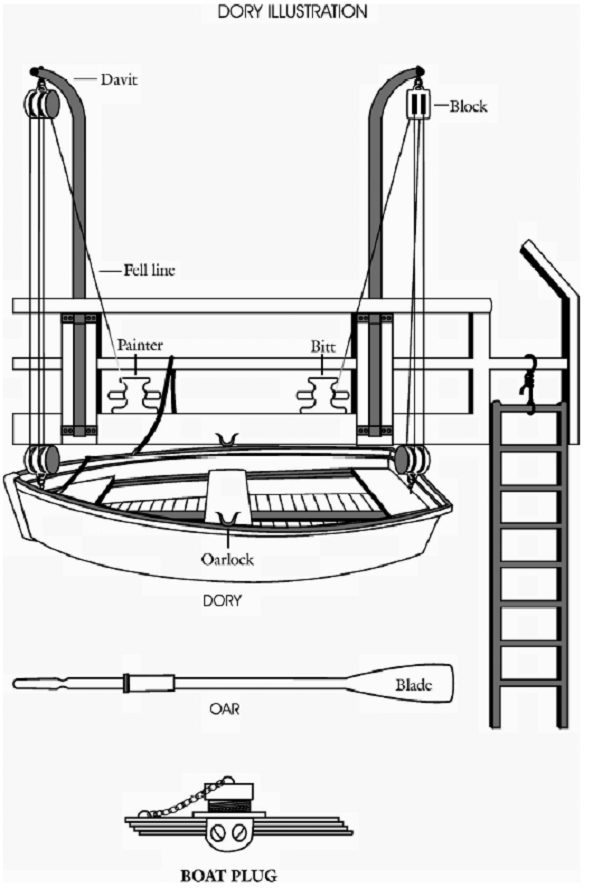
About Ships and Small Boats: Large ships need to carry small boats for a number of reasons. When people think of small boats on ships today, many think of lifeboats. In the unlikely event that it starts to sink, a ship should have enough small boats to hold all of the people on board. (Can you think of a famous ship that did NOT have enough lifeboats for all the passengers?) Today this is the most common reason that ships carry small boats, but historically there were many other reasons as well. When ships used to go out to sea fishing and whaling, they would bring small boats with them for that purpose. The ships would first sail out to the fishing grounds, sometimes a whole month’s journey away. Once they reached their destination, every day the sailors would launch the small boats and sail or row away from their ship. They would spend all day out fishing, hunting seals, or whaling, and return in the evening with their catch. Ships also used small boats to get into port, or to get their cargo into port, before there were docks with deep water to tie up to. In some ports, the sailors would have to lower the small boats miles from port and tow the big ship all the way in to the harbor. When the ship was anchored in the harbor, the only way for anyone to get ashore was on the small boats. Even if they were willing to get wet, most sailors did not know how to swim. Many captains were very strict with their crews about when they were allowed to go ashore, and how much time they were allowed to spend there. Boat Crew Responsibilities The boat crew is responsible for the proper handling of the small boats (dory, longboat, etc.). The Boat Crew must be able to prove their capabilities to the Captain, and be prepared to carry out any order he may give them regarding these boats. In addition, the Boat Crew must have knowledge of the proper use and location of safety equipment (i.e., life jackets), proper use of lines, and small boat operating orders for both the dory and longboat. The Boat Crew will lower and raise the dory to the commands given by the Mate. The mate must make sure that the boat is level, or “even keeled”, as it goes up and down. If it is not level, the Captain or whoever is in the boat could fall out! This means that the crew must work together to let the boat down and pull it up at the exact same speed. It is up to the mate to make sure that the crew does this. It will also be the Mate's responsibility that all lads are properly handling the lines. DORY PROCEDURES Lowering the dory: These are the commands the Boat crew must know/learn
1. "SECURE THE BOAT PLUG" - The boat is always hung in davits with the plug open so that the rain water will drain freely from the boat. The plug needs to be secured so the boat does not fill with sea water. 2. "STAND BY" - The crew is divided into two (bow line and stern line) and the last person in line scoops up the coil and carries it away from the cleat at a 45 degree angle to the pier. Once it has been laid out with enough room for the crew to hold it, capsize the coil, taking care not to block the entire pier. Once everyone is holding the line (with everyone on the same side of the line), stand ready for the next order. 3. "MAKE READY" - The last person in line goes forward to grab the fall line, shouts “line secure” and continues holding it while the cleat hitch is taken off the cleat by the first person in line. The first person gets back into position, shouts “line secure” and then the person on the fall goes back to his position at the end of the line. 4. "PREPARE TO SLACK AWAY, SLACK AWAY TOGETHER" - Lower the boat evenly using "hand-under-hand" motion To recover (lift up) the dory: 1. " PREPARE TO HAUL AWAY, HAUL AWAY TOGETHER" – 2. "AVAST" - When the boat reaches the upper block, the order "avast" is given. 3. "MAKE FAST" - Using the same procedure as "Make Ready," secure the bow and stern lines with a cleat hitch. 4. “COIL DOWN” - Lines are coiled clockwise directly on the horn. 5. “FREE THE BOAT PLUG” – Unplug the boat plug.
ROWING ORDERS "OUT OARS" - Oars are held in a horizontal position (parallel to the water) with the blades perpendicular to the water. "PREPARE TO GIVE WAY" - The crew bends over and extends their arms, lower than chest height, which sets the blade forward (remember that the crew is facing aft and where the bow is), ready for the next command. "GIVE WAY TOGETHER" - Pulling the oar handle up, which lowers the blade into the water pull toward the body and row, taking full strokes, keeping in unison with the first oarsman on the port side, known as the "stroke" oar. "WAY ENOUGH" - Stop rowing by pushing down on the handles which brings the blade out of the water and wait for the next command. "PREPARE TO BACKWATER" - Holding the oar handle close to your body at chest level, prepare to row in the opposite direction, pushing the handle away from you as you extend your arms. "BACKWATER TOGETHER" - All hands keeping in unison with the "stroke" oar, push the handle away from you as you extend your arms. "PREPARE TO HOLD WATER" - Hold the oars, ready to dip the blade into the water. "HOLD WATER TOGETHER" - Dip the oars into the water; this will act as a brake, so if there is any momentum be prepared for resistance. "SHIP OARS" - Pull oars across the boat so that they lay on the gun’l from port to starboard.
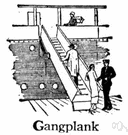
VOCABULARY The crew must have knowledge of the following nautical terms: Aft - in the rear or towards the stern of a vessel Bitt - small posts or timber heads fixed through the deck of the ship for fastening lines or cable Blade - the flat end of the oar which moves through the water Block and tackle - block, a wooden or metal shell pulley device used with line (called tackle) for mechanical advantage or to redirect the line Bow - the forward (front) end of the ship Chantey - chorus songs sung by the crew to help keep rhythm as they work Cleat - piece of wood or metal used for belaying (tying off) lines Coxswain - person in charge who gives longboat orders Davit - light crane on a ship's side (or pier) for lowering and raising boats Dory - flat-bottomed boat, usually kept hanging in davits Fall - the line to be hauled on as it comes from the top block Gangway - narrow platform or bridge passing from one deck of a vessel to another Gun’l or gunwale - top rail of the dory or longboat Horn - the wooden hook for holding the coil Longboat - strong rowboat over 20 feet long propelled by eight or ten oars Oarlocks - U-shaped metal piece for holding the oars Rudder - instrument which steers the boat Thwart - seat on a small boat Tiller - handle for the rudder
BOSUN CREW Roles:
Presentation Questions:
Bosun Crew Responsibilities Bosuns must be thorough seamen for they are responsible for many types of tasks. Bosuns, along with the Deckhands, are in charge of most tasks done "on deck”. These tasks may include: using a leadline, throwing a heaving line, setting hawsers and keeping bell time. Of course, the captain may order additional tasks that require the skills a Bosun possesses. One of the most important jobs when a ship is coming into port is finding the depth of the water. The Captain knows how far his ship goes under the water, called the draft of the ship, and the water needs to be at least that deep for him to be able to sail or be towed somewhere. If the water is not deep enough, the Captain could run the ship aground. When the bottom has sand or mud on it, running aground is bad because it will delay you and it can be very hard to get the ship unstuck. If the bottom is made of rocks or reef, not only could the ship get stuck, but it could get a hole and start to fill up with water. Even when a Captain is bringing his ship into familiar waters, he needs to be careful about checking the depth of the water because it can change! Most areas of the world have tides that rise and fall every day. In some places it is only a few feet, but in others like the bay of Fundy it can be as much as 20 feet. This means that if your ship goes 10 feet under the water, and you have 25 feet of water underneath you at high tide in the bay of Fundy, you could still be stuck on the bottom at low tide. Sometimes the sand and mud on the bottom can shift over time as well. These changes are generally less noticeable day to day, but can still be important. Modern ships have a lot of different tools that they use to determine the depth of the water. The main piece of equipment is called a depth sounder. It is an electronic device that sends out a sound signal from the ship or boat. The sound signal bounces off the bottom and the device measures how long it takes for the sound to return. This is the same way that cetaceans (dolphins and whales) find their way under water, and the way bats find their way through the air. Modern ships also use paper charts and electronic charts to help them tell what is underneath their boat. The charts have soundings on them that were taken within the past few years. Leadline A leadline is a tool for finding out the depth of the water and the composition of the ocean floor. It is probably one of the earliest devices used in coastal navigation. A leadline consists of a hemp line and a 7 lb. lead weight. Often the bottom of the weight is cup-shaped. Tallow (a type of animal fat) is pressed into this space to tell a sailor what type of an anchorage he has. If sand is stuck in the tallow he will know to use an anchor designed for sandy anchorages. If it comes up with small rocks stuck in the tallow he knows to use a different type of anchor. If the tallow comes up clean, he will know that he is above rocks. The average leadline is about 25 fathoms long. The line is marked with fathom marks (one fathom equals 6 feet). Fathom marks vary in size, shape, and color. The 2-fathom mark is 2 strips of leather. The 3-fathom mark is 3 strips of leather, and a 10-fathom mark is a square piece of leather with a round hole cut out from the middle. Leadline
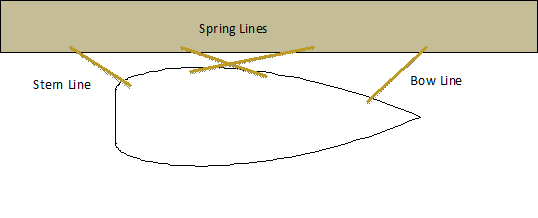
Hawsers Hawsers are large, thick lines used for either securing a vessel to the dock or towing another vessel. Hawser means ‘thick rope’ and so sailors give hawsers more specific names depending on the exact job they have. Hawsers also vary in length depending on which part of the ship they are meant to tie to the dock. Typically there are two very long hawsers; one set at the bow, called the bow line, and one at the stern, called the stern line. A hawser set from the middle of the ship is called either a breast line or a spring line, and usually does not need to be as long as the bow and stern lines. A typical configuration is to have two spring lines that cross each other, just like the diagram below. It is one of the jobs of the deckhands to prepare the correct lines in the correct places when a ship comes into port. Once the lines are distributed, the crew will get ready to send the lines ashore. Since the hawsers are large, they are also heavy and hard to throw. For this reason, sailors use heaving lines to get the hawsers across to shore.
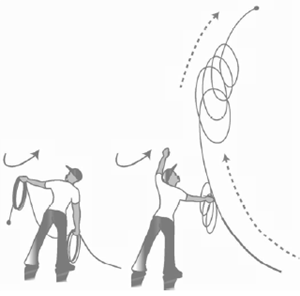
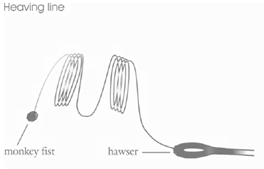
Heaving Line A Heaving line is a long, thin line with a heavy knot at the end called a monkey’s fist. This line is used for throwing to the dock or another boat when you need to pass a line across that is too heavy to throw. The first step to throwing a heaving line is to hitch the bitter end of the heaving line to a stationary part of the vessel. This will ensure that both ends of the line are not thrown over and the heaving line lost at sea. Once the line is secure, two neat coils are made in a clockwise manner. NEVER WRAP THE LINE AROUND YOUR ELBOW OR OTHER BODY PART. Other lads can be sent to the shore in order to catch the heaving line as it hits the dock. The person throwing the line holds one coil in each hand with the monkey’s fist coil in their throwing hand. Move to the closest point to the dock and heave the line in a smooth arcing motion towards the dock WITH BOTH HANDS. Once the heaving line reaches the other side, untie the bitter end of the heaving line and bend it to the eye of the hawser using a heaving line bend or bowline (not a square knot). At this point, part of the crew must go ashore to haul and part of the crew stays aboard to slack on the hawser. Once the eye splice reaches the pier, untie the heaving line from the eye splice and secure it to the bollard or cleat. On board the crew will haul any slack from the line (leaving enough slack in the line to allow for the changing tides) and, using a figure-eight pattern, secure the bitter end of the hawser to the vessel.
VOCABULARY Aft –the direction towards the stern of a vessel Bell time -time kept by ringing a series of bells every half hour Bend -attach or tie Bitter end -the inboard end of a line Bollard -single or double steel posts secured to the pier and used for mooring vessels Bow -the forward end of the vessel Breast line -a mooring line at a 90 degree angle to the keel, set abreast of the vessel Cleat -a piece of wood or metal with 2 horns used for belaying (tying) lines Ensign -a national, maritime, or nautical flag Eye or Eyesplice (on a line) –a permanent loop at the end of a line Foredeck -the raised deck at the bow of the vessel Forward - direction towards the bow of a ship Hawser -a line with a diameter of 2 1/2 inches or more Heaving line -a light weight "messenger" line with a monkey's fist knot at the end Lead line -consists of a hemp line, a 7 lb lead weight at the end and fathom marks used in finding the depth of the water Line station -where a line is secure to the vessel Spring line -a mooring line at less than a 90 degree angle to the keel Stern -the back end, of a vessel
DECKHAND CREW Roles:
Presentation Questions:
Deckhand Crew Responsibilities Signal Flags Ensign 24” tall by 36” long is an ideal flag size. It is best for the Teacher or a responsible adult to keep the ensign until the class arrives on the pier, that way it will not get left behind. Hawsers A Heaving line is a long, thin line with a heavy knot at the end called a monkey’s fist. This line is used for throwing to the dock or another boat when you need to pass a line across that is too heavy to throw. The first step to throwing a heaving line is to hitch the bitter end of the heaving line to a stationary part of the vessel. This will ensure that both ends of the line are not thrown over and the heaving line lost at sea. Once the line is secure, two neat coils are made in a clockwise manner. NEVER WRAP THE LINE AROUND YOUR ELBOW OR OTHER BODY PART. Other lads can be sent to the shore in order to catch the heaving line as it hits the dock. The person throwing the line holds one coil in each hand with the monkey’s fist coil in their throwing hand. Move to the closest point to the dock and heave the line in a smooth arcing motion towards the dock WITH BOTH HANDS. Once the heaving line reaches the other side, untie the bitter end of the heaving line and bend it to the eye of the hawser using a heaving line bend or bowline (not a square knot). At this point, part of the crew must go ashore to haul and part of the crew stays aboard to slack on the hawser. Once the eye splice reaches the pier, untie the heaving line from the eye splice and secure it to the bollard or cleat. On board the crew will haul any slack from the line (leaving enough slack in the line to allow for the changing tides) and, using a figure-eight pattern, secure the bitter end of the hawser to the vessel.
VOCABULARY Aft –the direction towards the stern of a vessel Bell time -time kept by ringing a series of bells every half hour Bend -attach or tie Bitter end -the inboard end of a line Bollard -single or double steel posts secured to the pier and used for mooring vessels Bow -the forward end of the vessel Breast line -a mooring line at a 90 degree angle to the keel, set abreast of the vessel Cleat -a piece of wood or metal with 2 horns used for belaying (tying) lines Ensign -a national, maritime, or nautical flag Eye or Eyesplice (on a line) –a permanent loop at the end of a line Flag halyard -the line used to raise and lower the flag Foredeck -the raised deck at the bow of the vessel Forward - direction towards the bow of a ship Hawser -a line with a diameter of 2 1/2 inches or more Heaving line -a light weight "messenger" line with a monkey's fist knot at the end Lead line -consists of a hemp line, a 7 lb lead weight at the end and fathom marks used in finding the depth of the water Line station -where a line is secure to the vessel Spring line -a mooring line at less than a 90 degree angle to the keel Stern -the back end, of a vessel
GALLEY CREW Roles:
Presentation Questions:
Nutrition at Sea When sailors go out to sea, they have to bring all the food that they needed for the entire voyage with them. Sailors have been doing this for thousands of years and have had to come up with many different solutions to the same problem: how do you keep the food from going bad? Modern sailors have a lot of ways to keep food from going bad, and the most important way is refrigeration. Modern ships that sail or motor across the ocean have refrigerators on them that work just the same as the one that you have in your house, but with one catch: they have to make their own electricity in order to run the refrigerator! Can you find out how ships make their own electricity? Historically, sailors had to find other solutions to keep their food from rotting. Fresh fruits and vegetables go bad very quickly, so even if a ship started out from port with them, they would not last more than a week. Sailors mainly ate bread and meat when they were at sea. Salt acts as a preservative, so they would actually pack their meat in salt in order to make it last. Even then, sometimes the meat would go bad before they reached their destination, sometimes 5 or 6 months after leaving port. One of the least expensive types of meat was pork, so “Salt Pork” was a common item on the menu. Sailors also baked special bread, called hardtack. Hardtack is basically just a biscuit that has been baked for a really long time. The less moisture it had in it, the less likely it was to mold or get bugs in it. After baking hard tack for hours and removing all the moisture, it can be nearly impossible to eat. Sailors usually soaked the hardtack in their daily ration of water before they could bite into it. Eating salt pork and hard tack every day is not what we would consider a “balanced diet” in our modern society. Science has told us that there are nutrients in food like carbohydrates, proteins, vitamins, and minerals that our body needs to function properly. If a persons body gets too many or two few of any of these nutrients, over time it can make that person sick. Today we know a lot about which nutrients are in which foods, and each person in your crew may already know that milk has calcium, oranges have vitamin C, bread has carbohydrates, or that meat has protein. However, until recently most people had no idea about the content of their food, not even scientists. All they knew is that when people didn’t have fresh food, they got sick. One of the most common illnesses that sailor got was called scurvy. We know now that scurvy is caused by a lack of vitamin C, but back then they didn’t know the cause. When a person gets scurvy, the first symptoms are that they become lethargic, or tired, and it’s hard for them to do their daily work. (Sometimes sailors would joke that their lazier shipmates had scurvy or were “acting scurvy” if they were not doing their work!) After a few months, a person with scurvy may have trouble breathing, have pain in their bones, and bruise really easily. In the advanced stages of scurvy, a persons gums and fingernails start to turn black and their teeth may fall out. (Picture the meanest, grossest looking pirate from the movies!) If a person has scurvy for long enough, he or she will die from it. Fortunately, even though they didn’t know what caused scurvy, sailors have known for a long time what cures scurvy: fresh fruits and vegetables! Mainly citrus fruits were used to treat scurvy once a ship was in port, but out at sea citrus fruits were not available. Many sailors did die of scurvy during the long ocean passages. Scurvy is now mostly a disease of the past, but ship cooks still have a big responsibility to keep their crew healthy by cooking good food. Good Luck! The Galley Crew is responsible for cooking and serving a snack, dinner and breakfast. The Captain will supply all the food and cooking equipment for dinner and breakfast, but the crew needs to arrive with a snack already prepared. It is a good idea to think about the nutritional value of what you are making, as well as how to keep your food from going bad! Below you will find a recipe for some cookies that will keep away tummy aches and stay good for a while, you might want to give it a try! Once on board, the Galley Crew will be cooking on a wood-burning stove and will therefore be responsible for maintaining the fire in the stove. Timing is very important (so you don’t burn things) and the mate needs to be very organized. The Galley Crew may also be called on deck to work with other crews or complete tasks including raising the staysail. RECIPE – A suggestion for a seaworthy snack! Joe Froggers (Cookies) You will need: ½ c. shortening Stir the flour and the spices (dry ingredients) together in a bowl and set aside. Cream the shortening and sugar in a large bowl, mixing well. Stir in the molasses and water. Add the dry ingredients to the shortening mixture. Chill dough in refrigerator for a few hours or overnight. Pre-heat oven to 375 degrees F. and roll to ¼ or ½ -inch thickness on a floured board. Cut with 3-inch round cutter (the top of a glass works well) and place on greased baking sheet. Sprinkle with sugar. Bake for 10 to 12 minutes in a 375° F. oven. Let the cookies stand on cookie sheet for a minute or two before removing to prevent breaking. Store cookies in airtight containers.
VOCABULARY Aft –the direction towards the stern of a vessel Bell time -time kept by ringing a series of bells every half hour Bitter end -the inboard end of a line Bollard -single or double steel posts secured to the pier and used for mooring vessels Bow -the forward end of the vessel Cleat -a piece of wood or metal with 2 horns used for belaying (tying) lines Cutting board – a wooden board used for chopping food on Ensign -a national, maritime, or nautical flag Foredeck -the raised deck at the bow of the vessel Forward - direction towards the bow of a ship Galley – kitchen on board a vessel Recipe markings of “c”– cup measurement Recipe markings of “t” or “tsp.” – teaspoon measurement Recipe markings of “T”“tbs.” - tablespoon measurement Measuring cup – a special cup with measurement marks Measuring spoon – a special spoon with measuring marks Recipe – a list of ingredients and how to put them together for a cooking or baking Stern -the back end, of a vessel Wood-burning stove – a stove which requires wood as its heat source
RIGGER CREW Instructions: (mates read aloud) Roles:
Presentation Questions:
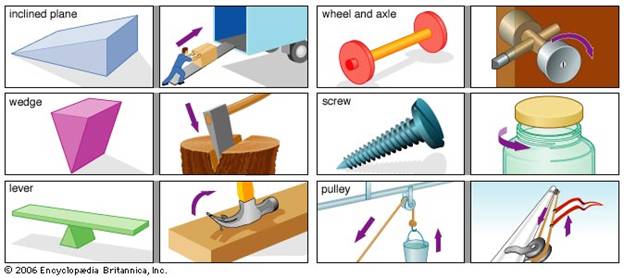
Simple Machines Simple machines are the most basic elements of complex machines, and they provide something called mechanical advantage. When we think about machines, we picture certain things in our head like a car or tractor, a large engine, a computer, or even a robot. These things are all machines, but they are very complex. Each one of them is made up of hundreds or thousands of smaller parts. If you can picture a set of Legos then you can understand how simple machines relate to complex machines. In a set of Legos, you start out with lots of little pieces. There are some big, some small, some skinny, some slant shaped. When you put them together in a certain way you can build a house or a fortress or a car, whatever you want really. But the pieces that you start with are always the same. The big difference between Legos and simple machines is that one Lego on its own doesn’t really do anything. That is not true for simple machines, each one can do an important job all by itself, or it can be combined with other simple machines to make a complex machine. There are six different things that are considered “simple machines”: The incline plane, the wedge, the level, the wheel and axle, the screw, and the pulley. Each of these simple machines helps to make a job easier. Another way of saying that is to say that each of these machines provides mechanical advantage. Look at the pictures below to get a better idea of how simple machines work. Can you think of some places in your daily life where you see simple machines?
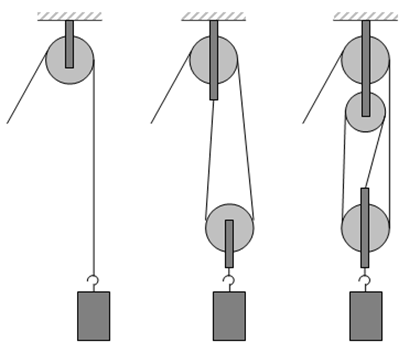
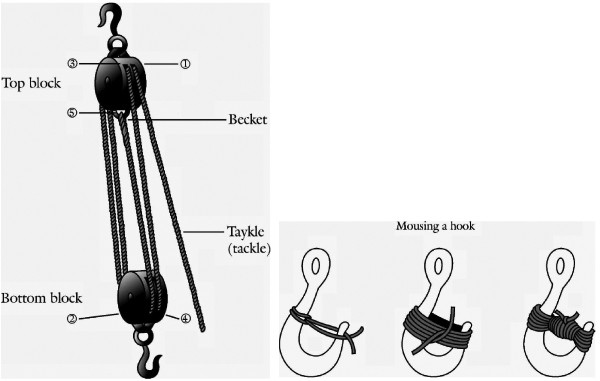
Simple Machines on Ships The reason that people use simple machines is to make their work easier, and on ships there is a lot of work to be done. There are many places that you find simple machines on a ship. Below are some pictures of ship parts, can you identify which simple machine each ship part is using? Block and Tackle The most common type of simple machine on a ship is a pulley, but on a ship, like most things, it has a different name. Pulleys on ships are called blocks. You see blocks everywhere in the rigging, and they are bigger or smaller depending on how much mechanical advantage they need to provide. The place where a rope goes through a block is called the sheave. For each sheave that a rope (called a line on a ship) goes through, you can divide the amount of weight you are lifting by that number. If you have a 100 lb weight and the line only goes through 1 sheave, you are still lifting 100 lbs. (100 ÷ 1 = 100). If you now run the line through 2 sheaves, you are only lifting 50 lbs. (100 ÷ 2 = 50) and if you have 3 sheaves then your work is cut down even more, so you are only lifting 33 lbs. (100 ÷ 3 = 33). The more sheaves you have, the less weight it feels like you are lifting, but the extra weight doesn’t just disappear, there’s a catch! Each time you add a sheave, you have to pull more line through it to make the weight go up the same distance! This time to figure out how much line you will need to pull, you multiply by the number of sheaves. If you want to lift your weight 10 feet in the air and your line passes through 1 sheave, you need to pull 10 feet of line (10 × 1 = 10). You’ll need to pull 20 feet with 2 sheaves, 30 feet with 3 sheaves, and so on.
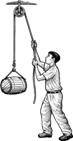
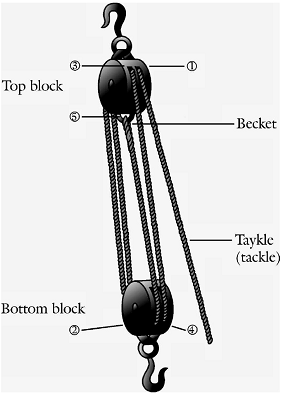
Rigger Crew Responsibilities The Rigger’s main task is to put together a block and tackle (pronounced “tay-kle”) and operate a bosun’s chair. The Rigger Crew will also stand a two hour night watch. There are two types of rigging on any vessel: the standing rigging and the running rigging. The standing rigging is stationary and consists of wires called stays and shrouds, which hold the masts in place. The running rigging is moveable and consists of lines (ropes) attached to one or more blocks for lifting power. Running rigging is used for hoisting sails and flags and lifting cargo or people (in the Bosun’s chair). As with all crews, the Rigger crew will perform any and all orders given by the Captain. The Mate has to know how to give and receive orders; the crew must know that they have to wait for the mate’s orders before doing anything. The Mate is responsible for the crew’s well-being, behavior of the crew and all the work assigned to the crew; therefore the Mate makes all decisions regarding the crew’s activities and tasks and the crew reports directly to the Mate upon completion of a task or if any questions need asking. Working together, mate and crew will need to assemble a double-sheaved block and tackle and mouse a hook.
VOCABULARY Bosun’s Chair – a swing-type chair used to reach parts of the mast that cannot be Becket – see Block diagram Bitter End – end of a line Standing Part – working part of a line that is attached to something Block-and-Tackle (pronounced tay-kl) – One or more pulleys and lines used to create mechanical advantage (or lifting power) for heavy objects; the block is the pulley and the tackle is the moving line through the block Cheek – see block diagram Mousing – see diagram Tag Line – a line used in conjunction with a block and tackle to guide an object that Seize – to secure or fasten something by means of a smaller binding line (similar to mousing)
STEVEDORE CREW Roles:
Presentation Questions:
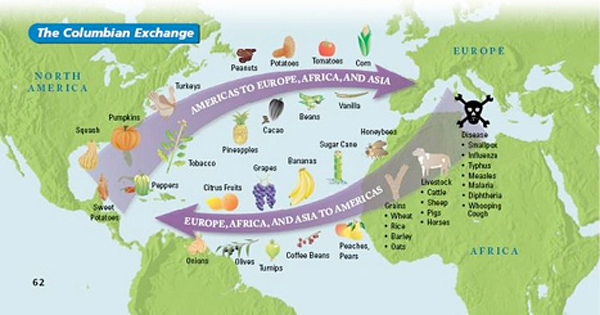
Stevedores People have been trading goods around the world for thousands of years. Since different regions of the world have different natural resources, trade helps people have access to things that are hard to find in their own region. In some cases, the goods that people trade for are not available at all in their own region. One example is plants that are endemic, or native, to a certain region of the world. In addition to plants, there were many other things that were traded across oceans. Look at the map below to see some examples of plants, animals, and other things that were traded after Columbus landed in the Americas.
Other types of goods can be found all over the world, but some regions have a surplus and others have a shortage. A good example of this is lumber from trees. Some regions are densely forested and have an abundance of lumber for building houses and ships. Other regions are mostly desert or plains with few trees. These places need to ship lumber in for building up their towns and cities. Can you find out what natural resources are easily available in the San Francisco Bay Area? How about scarce resources that need to be shipped in? Whether people are trading for something they don’t have in their region, or something that they need more of, there are a few things that are always the same. Traders want to move their goods as quickly as possible and they do not want to spend a lot of money doing it! Since people have been trading for thousands of years, they have had time to come up with the most efficient ways of moving goods from one place to another. In ancient times, traders used to load carts pulled by animals (donkeys, camels, or horses) across trade routes to get between Europe and Asia. During the time of Columbus, traders took to the high seas and loaded cargo onto ships. This allowed them to travel faster, and to new places, but it also created new risks. Traders had to protect their goods from weather and sea water. About 100 years ago, from the late 1800’s until the early 1900’s there were many different ways to move cargo around the country and around the world. Each way of moving goods had some benefits and some drawbacks. Traders could load their goods onto a covered wagon and have it pulled across the country by horses. This took several months and could be very dangerous. The transcontinental railroad was complete in 1869, and this was another way to ship goods across the country. Trains represented the most modern form of cargo transportation at that time, but this technology was also fairly expensive. Sailing ships were the main mode of transportation for bulk cargo moving from the east coast of the United States to the west coast. The voyage took several months, but it was inexpensive and the ships could hold large amounts of cargo. This did not stay the same with the passage of time, however. As technology continued to improve, prices dropped for shipping goods by rail (train) and by the 1930’s sailing ships became obsolete as a method of shipping cargo. Major businesses still ship millions of tons of cargo around the world each year by cargo ship. Modern ships are not powered by sail, though. They have engines that run on fossil fuels, like diesel. You may know about hybrid and electric cars that use little or no fossil fuels. Similarly, some modern shipping companies are trying to use sails in a more modern form to try and use less fuel. No matter how it is shipped, cargo needs to be loaded and unloaded carefully by stevedores all over the world. Captains, sailors and stevedores alike in the 1800’s often used the phrase “cargo is king”. For the sailors and stevedores, this was not a favorable saying, and what it meant was that cargo was the most important thing on board the ship. The cargo was worth money, and if it got wet, rotted, or got spilled overboard, that meant the captains and the shipping company were losing money. When sailors and stevedores said “cargo is king” what they were really saying was “respect that cargo as if it were royalty”. If a stevedore dropped a bail of hay into the San Francisco Bay while loading a ship, they were responsible for the cost of that hay. Imagine how careful they had to be!
Stevedore Crew Responsibilities The Stevedore’s crew main task is to move a barrel of cargo from the ship onto shore. The Stevedore Crew will also stand a two hour night watch. There are two types of rigging on any vessel: the standing rigging and the running rigging. The standing rigging is stationary and consists of wires called stays and shrouds, which hold the masts in place. The running rigging is moveable and consists of lines (ropes) attached to one or more blocks for lifting power. Running rigging is used for hoisting sails and flags and lifting cargo or people. As with all crews, the Stevedore crew will perform any and all orders given by the Captain. The Mate has to know how to give and receive orders; the crew must know that they have to wait for the mate’s orders before doing anything. The Mate is responsible for the crew’s well-being, behavior of the crew and all the work assigned to the crew; therefore the Mate makes all decisions regarding the crew’s activities and tasks and the crew reports directly to the Mate upon completion of a task or if any questions need asking. Working together, mate and crew will need to move a barrel of cargo from the ship onto shore.
VOCABULARY Bosun’s Chair – a swing-type chair used to reach parts of the mast that cannot be Becket – see Block diagram Bitter End – end of a line Standing Part – working part of a line that is attached to something Block-and-Tackle (pronounced tay-kl) – One or more pulleys and lines used to create mechanical advantage (or lifting power) for heavy objects; the block is the pulley and the tackle is the moving line through the block Cheek – see block diagram Mousing – see diagram Tag Line – a line used in conjunction with a block and tackle to guide an object that Seize – to secure or fasten something by means of a smaller binding line (similar to mousing)
|