11A1. General. The operator of any piece of
machinery should thoroughly understand the
various adjustments that are necessary for perfect operation. It is not enough for him to know
merely which valve to open and close or the
position of maneuvering levers in order to start,
stop, and reverse his machine. He must possess
knowledge of the functioning of each of its
systems when he manipulates this gear. He
should be alert to note the difference between
efficient and poor performance by the sound,
smell, and touch of the machinery. Instruments,
such as gages, thermometers, and tachometers,
however, should be the guides that the operator
uses in detecting the approach of trouble so as
to take corrective measures before anything
serious occurs.
The modern diesel engine demands greater
skill on the part of the designer and builder
than any other kind of engine. Likewise in its
operation it is far from being foolproof and
requires intelligent attention. The adjustments
are precise and to narrow limits. Overhaul and
fitting of the pistons, rings, bearings, valves and
fuel pumps are beyond the capacity of the
ordinary machinist and demand the efforts of a
skilled mechanic. If it is properly adjusted, a
diesel engine, once started, will run until it is
stopped. The extent of its reliability over a long
period of operation depends upon the intelligence and skill of its operator.
Care must be used when operating oil engines of any make, regardless of whether the
engine is of the 2- or 4-stroke cycle, vertical or
horizontal, air or mechanical injection. The
working principles are the same, and the same
care must be exerted to have everything properly adjusted before starting or operating the
engine. Otherwise, there may be trouble. Every
bearing should be adjusted as tightly as possible.
This is a task for the real mechanic and should
not be entrusted to unskilled personnel. The
upkeep of the engine is an important duty, and
one in which the real engineer shows his value.
It should be kept in mind that measurements of
sixty-fourths and thirty-seconds of an inch are
not recognized in diesel engine work; the increment of measure for everything is thousandths
of an inch.
There should be a regular routine for checking the different systems of the engine and performing upkeep functions. At this time all indications of wear, parts renewed, and adjustments
made should be recorded in a systematic log
book to be used as a history from which information may be obtained at future overhaul
periods. This is always done during submarine
refit periods and at any other time when it is
found necessary.
11A2. Construction of bearings. The method
used in construction of a bearing depends
upon the type, the bearing metals to be used,
and the type of use required. In the case of
precision type bearings, it is necessary that the
two halves form a true circle when finished. This
requires rather ingenious practice, and shop
procedures will vary.
Other than the shop procedure, there are
only a few items concerning the construction of
bearings that are worthy of mention. The first of
these is the question of oil grooves. Bearing
lubrication in the 2-stroke cycle engine is more
difficult than in the 4-stroke cycle engine, since
in the latter, the point of contact between bearing and journals of both main and crankpin
journals rotates around the bearing and assists
in the distribution of the oil. In the 2-stroke
cycle engine, the point of contact swings back
and forth across the lower bearing shell and
hence, in this engine, it is usually necessary to
provide oil grooves on the unloaded side to
carry sufficient oil to the loaded half of the bearing. Where bronze or other flat bearings are used
as wrist pins, ample grooving must be provided.
Grooves may be cut axially, circumferentially, diagonally, or helically across the face
of the bearing, but should never extend to the
edge since this would allow the oil to spill from
the bearing. All grooves should have rounded
216
edges, as the sharp edge of a groove has a tendency to act as a scraper and may impair the
oil film.
In order that the flow of oil between the
bearing halves may not be restricted, bearings
are beveled for an arc of about 20 degrees at the
joints where the bearing halves come together,
except for a narrow strip at the ends, where the
full thickness of the metal must be retained to
prevent the loss of oil. The spaces formed by
beveling are called oil cellars.
11A3. Bearing loads. The only bearings in a
diesel engine that require careful consideration
due to the heavy loads placed upon them are
the main, crankpin, and wrist pin bearings.
Other bearings are not so limited in size, and
little attention need be given them in so far as
their ability to carry the load is concerned. The
following discussion pertains principally to the
above three heavily loaded bearings that are
usually limited in size by the space available.
The study of bearing loading brings two
things to mind: 1) the temperature at which
the bearing must operate, and 2) the maximum
pressure per unit area that will be exerted upon
the bearing. Too much pressure will squeeze out
the oil film and ruin the bearing, and too much
heat will reduce the viscosity of the oil until the
film can no longer be maintained. Both of these
are factors of loading, although the latter is a
product of loading and speed of rotation.
In a diesel engine operating at variable
loads, the successful bearing design is generally
the result of experimentation directed toward
the discovery of a satisfactory bearing for all
loads. The loads that a bearing can withstand
are based upon the assumption that the surfaces
of the journal and bearing are smooth and parallel, that proper clearances are provided, and that
sufficient lubrication is provided. Too much oil
clearance at the ends of a bearing will cause
excessive oil leakage and subsequent reduction
in load-carrying ability. If the bearing were
closed at the ends, the pressure would be uniform over its entire length, and much greater
loads could be carried. If the shafting is of in
alignment, or vibrates severely, as when running
at a critical speed, the faces of the journal and
bearing will not be parallel, and the metallic
surfaces may make physical contact and rupture
the oil film.
From the above, it is obvious that an oil film
must be maintained at all times in order to carry
the load. This condition is called stable lubrication. When the oil film is destroyed and lubrication of the bearing depends entirely upon the
oiliness of the lubricant, we have what is known
as unstable lubrication. This latter condition exists when the bearing shaft is running at too low
a speed to build up an oil film or when the
bearing is overloaded.
11A4. Bearing metals. Compared with the
journal, the bearing metal should be sufficiently
soft so that any solid matter passing through in
the oil stream will wear the bearing instead of
the journal.
Roller and ball bearings are frequently
used in diesel engines for smaller shafts, such as
camshafts, and in governors, because they
greatly reduce the bearing friction and because
their smaller clearances keep the shaft more
rigid. In at least one opposed piston type of
diesel engine of medium power, ball bearings are
used as main bearings. For wrist pins, roller
bearings of the needle type are used extensively
in other types of large engines. With these bearings, lubrication is made simpler, and the amount
of freedom of motion and friction is reduced.
Wood is used in the tail shaft bearings of
naval vessels that are submerged in water and
constantly lubricated and cooled. Lignum vitae
is the wood commonly used for this purpose
since it is of a greasy character and extremely
hard and dense. Other types of materials used
for this purpose include hard rubber strips and
phenolic resinous materials.
Bronze bearings are used where the pressures are very high such as at the wrist pin.
Here the load on the bearing is the total gas
pressure less the inertia of the piston. In most
modern diesel engines, bronze is used as the
bearing metal for the wrist pin bearing.
There is no material known that is suitable
for all types of bearings. There are four general
types of alloys used today but each has its own
particular uses determined by the maximum
unit pressure and temperature at which the
217
bearing will operate, and by the hardness of the
journal.
Bearing metals should be of such composition that the coefficient of friction is low. They
should be sufficiently hard and strong to carry
the load, but must not be brittle. If they are too
soft, they will wipe or be pounded out, destroying the clearance and reducing the bearing area.
In grooved bearings the grooves will become
filled with wiped metal. When this trouble arises
the oil film is squeezed out, the metal is burned,
and failure results.
The four commonly used types of bearing
linings are: high-lead babbitts, tin-base babbitts,
cadmium alloys, and copper-lead mixtures.
The backs for bearings are made either of
steel or bronze in the case of the babbitts, while
only steel backs are used for cadmium alloy and
copper-lead bearings. In some bearings, an intermediate layer of metal is used between the
backs and the bearing metals.
The hardness of the above bearing metals
naturally varies with the percentage of alloying
employed. In general, however, the copper-lead
and cadmium alloys are the hardest, while the
high-lead and tin-base babbitts are the softest.
The temperature at which the bearing metals
melt is a rough measure of their degree of hardness, the softer metals melting at the lower
temperatures. The softness of the bearing metal
is also a measure of the maximum allowable
unit pressure. The harder the bearing metal, the
greater is the load that a given size bearing will
carry without failure.
Where two metallic surfaces are moving in
contact with each other, such as a journal rotating within a bearing, wear will inevitably take
place. Since it is easier and cheaper to renew
the bearing, the journal should "be harder than
the bearing. Therefore, when using relatively
hard bearing metals, such as cadmium alloy and
copper-lead, it is necessary to use a hard alloy
steel journal or else to harden the surface of
the journal.
The precision type of bearing is rapidly
coming into universal use for crankpin and
main bearings. There is an increasing use of
very thin bearing linings on steel shells. The
shells are either forged or cast, and the linings
are made of lead-base babbitt metal.
In the naval service the most frequently
encountered bearing metal used in precision
bearings is that known by the trade name of
Satco. The composition of this metal is as follows:
Percent
Calcium
.30- .70
Mercury
.40- .90
Tin
1.00-2.00
Aluminum
.15- .17
Magnesium
0.00- .05
Lead
Remainder
11A5. Bearing installation and adjustment.
In order to insure its successful operation, the
bearing must fit the journal perfectly; the
bearing and journal surfaces must be smooth
and parallel, and the bearing clearance must be
correct. Too great a clearance will allow the oil
to spill out at the ends of the bearing, while too
small a clearance will cause the bearing to run
hot. In general, the least clearance that will
allow the successful operation of the bearing
is desirable.
In the modern high-speed engine the precision type of bearing is generally used. No scraping-in is done, and no shims are used between
the faces of the two halves. The bearing is
accurately machined to the correct diameter
and the only fitting necessary is an occasional
filing down of the faces of the two halves in
order to obtain a close and even fit when the
bearing caps are brought together. In connection
with the fitting of precision type bearings, too
much emphasis cannot be placed upon the importance of having the backs of the bearing
shells fit evenly against the bearing support.
Recent experience with bearing failures due to
this improper fitting has shown its importance.
The areas not in contact fill with oil or air, both
of which are relatively poor conductors of heat,
and the transfer of heat from the bearing is
reduced, causing the bearing temperature to increase. In addition, if an even fit is not obtained,
a flexing of the bearing shell may result, causing the bearing metal to crack and flake off.
218
To assure an even fit the backs of bearings
should be fitted to their supports in the same
manner that the bearings are fitted to the journal. Since the back usually is made of steel, it
is necessary to file down the high spots rather
than scrape them down as is possible with
softer bearing metals.
11A6. Bearing failures. When an engine
bearing fails in service it can generally be attributed to one or more of the following causes:
1. Poor operating conditions and improper
maintenance such as:
a. Improper or insufficient lubrication.
b. Insufficient cooling water.
c. Grit or dirt in oil.
d. Water in oil.
e. Bearings out of alignment.
f. Installing the bearing with improper
clearances or uneven bearing surface.
g. Excessive load on the bearing.
2. Faulty design of the bearing or of the
engine itself.
a. Improper dimensions of length and diameter.
b. Improper bearing material.
c. Improper lubrication. The lubricant, free
from all foreign matter, must be supplied in
ample amounts.
d. Improperly cooled.
e. Improperly grooved.
f. Improperly baffled. Proper baffles must
be fitted to prevent loss of oil, or its passage to
adjacent parts of machinery, such as generator
armature, where damage would result to the
commutator. Also in some cases baffles are used
to prevent the mixing of water with the lubricating oil.
3. The use of inferior lubricants, or the
use of a good lubricant which does not meet
the requirements of the piece of machinery.
a. Corrosion of bearings.
4. Inferior workmanship and material in
the manufacture of the bearings and engine
parts.
A bearing that is not operating properly
will overheat. When this occurs, and the reason
is not immediately known, the oil supply to
the bearing should be examined at once. Also
the lubricating oil gage pressure to the system
and the passage of cooling water through the oil
cooler should be checked. Sometimes the overheating may be due to foreign matter in the
lubricating oil. The oil should be rubbed between the fingers to detect the presence of grit
or dirt. An inspection of the filters will also
reveal any abnormal amount of foreign matter
deposited there. Since used oil generally is
slightly acid, the presence of salt water may be
detected by inserting a strip of red litmus paper
in a sample of the oil. If salt is present to any
degree, the litmus paper will turn blue. If salt
water is detected in the oil, the crankcase and
sump tank should be drained and refilled with
new oil after flushing the system thoroughly. If
possible, the cause of the salt water in the system should be determined. At the first opportunity the system should be well cleaned to
remove any particles of salt that may have been
deposited there.
As a rule, hot bearings may be traced to
one or more of the following causes:
1. Improper or insufficient lubrication.
2. Grit or dirt in the oil.
3. Bearings out of line.
4. Bearings set up too tightly.
5. Uneven surface of bearing or journal.
6. Bearing overloaded.
If the temperature of the bearing continues
to rise after the oil supply has been increased,
the condition known as a hot bearing arises. The
danger of a hot bearing lies in the fact that the
babbitt expands until it grips the journal, thus
causing a constant increase in friction and heat.
When the temperature reaches the melting point
of the bearing metal, the metal will run or wipe.
The treatment of heated bearings involves
two main items: the removal of the cause, and
the restoration of the bearing to its normal condition. If the trouble is due to improper or insufficient lubrication and is discovered before
the metal has wiped, an abundant supply of oil
usually will be sufficient to control the situation
and gradually bring the bearing back to its normal temperature. Should the trouble be caused
by an accumulation of dirt on the bearing, the
abundant supply of oil will generally flush out
219
the impurities sufficiently to permit operation.
If the trouble is caused by foreign matter in the
oil, the oil will have to be renovated or renewed.
If the bearings are out of alignment, if they
are set up too tightly, or if they have been
improperly fitted, the fault cannot be fully
remedied until the improper adjustments have
been rectified. This usually involves stopping
the engine.
In all cases the temperature of the bearing
can be lowered by slowing down and thus decreasing the amount of load on the bearing. If
the trouble has reached an advanced stage, it
may be found necessary to stop the engine.
When stopped, the bearing cap can be eased up
a slight amount, thus increasing the clearance
between the bearing and journal. However, the
greatest care must be exercised in easing up
on the bearing cap, for if too great a clearance
is given, trouble will be experienced from
pounding.
When the trouble is inherent in the bearing
-as for example, if the machinery is not properly lined up, or the bearings are of insufficient
area, or not in proper condition-only temporary relief can be secured from using the various
means suggested above. The most effective treatment of a hot bearing is probably the operation
of the machinery at a low or moderate power
until such time as the needed readjustments,
changes, or repairs can be effected.
To summarize the treatment for a hot
bearing, the measures to be taken may be selected according to the special circumstances,
from the following:
1. Lubrication.
2. Slowing down, and consequent reduction
of load, or stopping.
3. Cooling water to oil cooler.
4. Easing up bearing caps.
Even though relief is obtained by the above
measures, it should be borne in mind that once
a precision bearing has wiped, it is necessary to
renew the bearing as soon as possible.
The wear on journals rotating in bearings is
seldom, if ever, evenly distributed over the
entire surface. Consequently the journal wears
until it becomes eccentric or egg-shaped. This
condition can become serious enough to cause
bearing failures, and the only remedy is to
machine or grind down the journal until it is
again cylindrical. This, of course, will reduce the
diameter and necessitate using a bearing of a
different bore in order to effect the proper bearing clearances.
Journals should be kept smooth, even, and
free of rust at all times. To remove spots of rust
or ridges, the journal should be dressed with a
fine file and then lapped with an oilstone or with
an oilstone powder. Carborundum may also be
used. If Carborundum is used, great care must
be taken to remove all particles, as these, if
allowed to remain, will cause cutting and grinding of bearings.
When bearings have been removed for long
periods, such as during a major overhaul, it is
customary to wrap the journals with canvas in
order to protect them from accidental damage.
When this is done, only new canvas should be
used. There have been cases where journals
were wrapped with old rags or burlap that
contained some acid. The action of this acid corroded and pitted the journals and it was found
necessary to renew the entire shaft.
Each time a bearing is removed for any
reason the journal should be carefully inspected.
Any evidence of pitting or general corrosion
indicates the presence of acid or water, and the
lubricating oil should be analyzed immediately.
When a bearing clearance exceeds the allowable tolerance, or when the bearing fails due
to scoring, wiping, spalling, or cracking, looseness of the bearing metal, or for any other
reason, it must be renewed.
To renew a precision type bearing it is first
necessary to have available a spare bearing.
These are manufactured to size and are available from the manufacturer. They are bored to
correct dimensions, so that only a slight amount
of scraping in and filing of the edges of the shell
faces is required to produce an accurate fit.
There seems to be a tendency to renew Satco
bearings before it is necessary. A slight amount
of spalling is not necessarily an indication that
the bearing properties of the metal are destroyed.
220
B. COUPLINGS
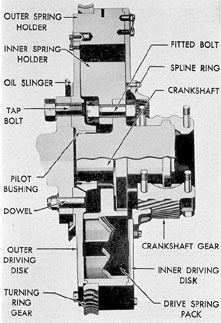
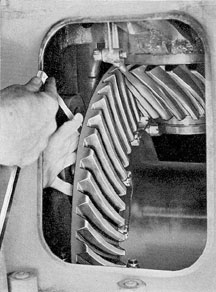
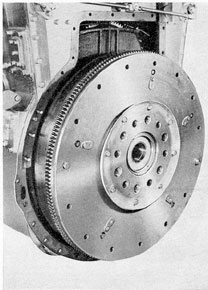
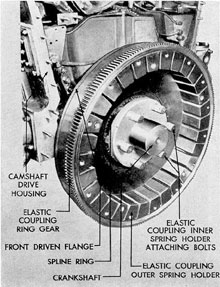
11B1. GM elastic coupling. The crankshaft
of the GM 16-278A engine is connected to the
generator shaft by means of an elastic coupling.
The elastic coupling connects the engine to the
generator flexibly by means of radial spring
packs. The power from the engine is transmitted
from the inner ring, or spring holder of the coupling, through a number of spring packs to the
outer spring holder, or driven member. A large
driving disk connects the outer spring holder to
Figure 11-1. Elastic coupling cross section, GM.
the flange on the driven shaft. The pilot on the
end of the crankshaft fits into a bronze bushed
bearing on the outer driving disk to center the
driven shaft. The turning gear ring gear is
pressed onto the rim of the outer spring holder.
The inner driving disk through which the
camshaft gear is driven is fastened to the outer
spring holder. A splined ring gear is bolted to
the inner driving disk. This helical internal gear
fits on the outer part of the crankshaft gear and
forms an elastic drive through the crankshaft
gear which rides on the crankshaft. The splined
ring gear is split and the two parts bolted together with a spacer block at each split joint.
This makes it possible to engage separately the
two parts of the splined ring with the crankshaft
gear teeth, and to slide them into position with
the idler gear in place.
The parts of the elastic coupling are lubricated with oil flowing from the bearing bore of
the crankshaft gear through the pilot bearing.
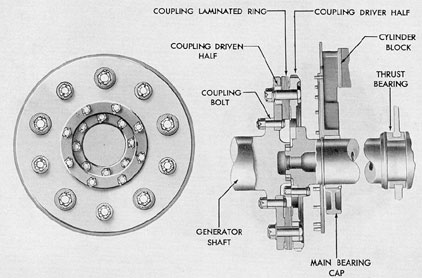
11B2. F-M flexible coupling. The crankshaft
coupling on an F-M installation consists of three
parts: the engine coupling driving half, the
laminated rings, and the generator coupling
driven half. The coupling driving half is fastened to the lower crankshaft with fitted bolts,
and the coupling driven half is likewise fastened
to the generator shaft. Power from the engine
is transmitted through the laminated rings by
means of a third set of fitted bolts held in place
by ring bolt spacers.
Pilot rings between the ends of the generator shaft and the crankshaft form a safety
guide in the event of failure of other parts.
Tapped holes for jackscrews and drilled holes
for body fitted bolts are provided in the lower
flanges of the cylinder blocks. To permit fitting
of the coupling bolts to the generator shaft, it is
necessary to remove the lower and upper halves
of the end cover back of the coupling driver half,
the lower bearing cap, and the lower crankcase
side cover at the vertical drive compartment.
Guards and two jackscrews of different
lengths are furnished with the tools by the
engine manufacturer for use in removing and
installing the coupling bolts. The guards protect
the bolt threads and are tapered to facilitate
entry of the bolts when fitting.
When installing coupling bolts in either set,
the shorter jackscrew should be used for starting
the installation and the longer jackscrew for
completing it.
221
Figure 11-2. Crankshaft coupling, F-M.
C. ALIGNMENT
11C1. General. Good engine and generator
performance can be obtained only if the original
coupling installation is made with the components in correct alignment and with correct
clearances. The problem of originally aligning a
generator set and subsequent checking arise
quite frequently during submarine wartime operations. The original alignment, of course, is
extremely important as it greatly influences
future operation and adjustment of the engine.
During navy yard overhauls it is common practice to take motors and generators out of the
ship for overhaul, and the young engineer officer
or new leading chief motor machinist's mate is
frequently called upon to check an alignment
job being done by naval shipyard personnel. It
as also become routine to check crankshaft
alignment to some degree after an engine overhaul in which many of the engine parts have
been renewed. This may be only a checking of
the crank cheek deflections with the use of a
strain gage, but even this will give the operating personnel a
good idea as to the status of the
alignment of the equipment. The most important and most difficult job of alignment is the
complete installation, of a generator set. The
salient points of these installations will be covered in the following paragraphs. When the
principles involved in a complete alignment job
are understood, smaller alignment problems become relatively simple.
NOTE. Alignment tests and corrective
measures should never be undertaken when a
vessel is in drydock because the alignment of
the shafting is not the same when the vessel is
waterborne as when it is in dock.
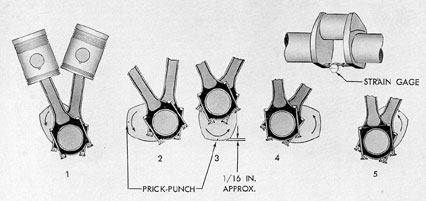
11C2. Strain gage readings. The strain
gage is basically a micrometer for measuring
the differences in distance between the two webs
or cheeks of a crankshaft during a revolution
of the shaft. As previously stated, one of the
basic alignment procedures is the taking of
strain gage readings. This is a relatively simple
222
Figure 11-3. Position of crankshaft for strain gage readings.
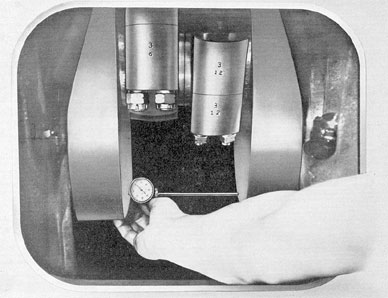
Figure 11-4. Measuring crank check deflection with a strain gage.
223
undertaking but it is important that the procedure be followed exactly for best results. A
series of strain gage readings of a crankshaft
gives a measurement of the crank cheek deflection for various angular positions of the shaft.
The measurement is accomplished by placing
the gage between the engine crankshaft cheeks.
The gage should be installed with its two endpoints in the crankshaft prick-punch marks. The
crankshaft should be turned to its initial position
so that the gage will be as close to the top
position as possible without touching the connecting rod. The dial of the strain gage is then
set on zero, and the crankshaft is slowly jacked
over to subsequent positions as shown in Figure
11-3 and the readings taken. When taking the
readings, the gage should not be allowed to
rotate about its end-points.
After the readings have been taken for one
revolution of the crankshaft, they should be
compared, and the maximum crank deflection
obtained. Large variations in the individual
readings indicate some type of misalignment in
the installation.
11C3. Alignment of engine crankshaft with
one bearing generator. This type of installation is that normally found on F-M generator
sets. There are many recognized methods of
accomplishing alignment of engine and generator. The following procedure is one method and
is discussed more from the standpoint of alignment principles than of a standardized alignment procedure.
Generators and crankshafts that are being
coupled together must be in alignment. This
condition is attained by moving the shaft bearing supports vertically and horizontally until
the two halves of the coupling are true to each
other or until the axes of the two shafts coincide
at the point where they are coupled. The operation usually involves movement of the entire
generator casing.
In the following alignment it is assumed
that the engine is already located. Before starting alignment, the amount of crankshaft cheek
deflection should be known and recorded in
order to be able to make a comparative check
during and after the alignment has been completed. The crankshaft cheek deflection readings
should agree within approximately 0.002 inches.
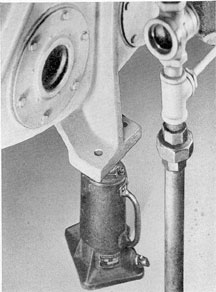
Figure 11-5. Using hydraulic jack to adjust height
of generator body for proper vertical alignment.
In all modern submarines the engines are
attached to a generator rather than directly to
propeller shafts. When a generator is being installed, it should be originally placed as nearly
as possible in final alignment. Subsequent procedure is as follows:
1. Attach the driven half of the crankshaft
coupling to the driver half by installing the
outer row of bolts around the coupling. Tighten
the bolts evenly.
2. Secure the generator shaft to the flexible
coupling by installing coupling bolts through
the flange on the end of the generator shaft into
the driven flange of the coupling.
3. Check the strain gage measurements to
determine whether or not the coupling operation
has affected the original reading. If a large
change is noted at a particular position of the
crankshaft, it indicates that the coupling has
placed a strain on the crankshaft.
4. Check the thickness of the flexible coupling with a micrometer. The measurements
should be made at the top and bottom, inboard
and outboard. Compare the measurements with
224
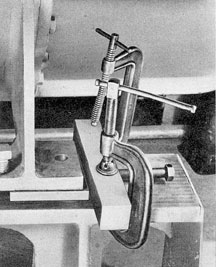
Figure 11-6. Using portable block and jack screw to
adjust generator body for proper lateral alignment.
Figure 11-8. Using portable block and jack screw to
adjust generator for proper thrust clearance.
Figure 11-9. Measuring crankshaft thrust bearing
clearance toward control end of F-M engine.
225
the established dimension stamped on the flange
by the manufacturer. For example, the manufacturer's dimension is 5.225 inches. The outboard measurement as made with the micrometer is 5.250 inches. The inboard measurement
is 5.200 inches. This indicates that the generator
shaft is placing a strain on the inboard side of
the coupling and is probably also affecting the
strain gage reading on the crankshaft. Therefore,
the generator casing and shaft must be moved
outboard 0.025 inches to balance the readings
on the coupling and to remove the strain from
the crankshaft. Normally, this should bring the
strain gage readings back to the original
readings.
If a difference in the measurement of the
coupling, against the stamped dimension, occurs
at the top or bottom of the coupling, the generator casing and shaft will necessarily have to
be raised or lowered to effect a balanced condition. The height of the generator casing and
shaft may be adjusted by means of hydraulic
jacks placed under the casing as shown in Figure 11-5. When the proper height is attained,
block up the casing, remove the jacks, and
install shims between the feet and the permanent pedestals on the deck.
The generator shaft and casing may be
moved inboard or outboard by installing a portable block and jack screw against the edge of
the side foot mountings of the casing as shown
in Figure 11-6. To check the distance of the
movement, attach a dial indicator on the opposite pedestal with the indicator pointer touching
the edge of the opposite foot of the casing.
5. Remove the generator thrust bearing
cap and measure the generator shaft thrust
bearing clearances (Figure 11-7). The clearances should measure 0.0075 inch (approximately) at each end and on each side of the
bearing in an F-M installation. If it is found,
for example, that there is no clearance at the
thrust face away from the engine, the generator
casing must be moved toward the engine 0.0075
inch with a portable block and jack screw (Figure 11-8). This operation, however, should not
be accomplished until the crankshaft thrust
bearing clearances have been measured, since
it is possible that only one movement of the
casing will be needed to correct both crankshaft
Figure 11-10. Measuring crankshaft thrust bearing
clearance toward generator end of F-M engine.
and generator thrust bearing clearances.
6. Measure the crankshaft thrust bearing
clearances by inserting a feeler gage between
the crank cheek and the face of the bearing
(Figure 11-9), and between the vertical drive
gear and the generator end of the bearing
face (Figure 11-10). The total clearance should
measure between 0.004 and 0.010 inch evenly
distributed on both sides. If the clearance on
one side is greater than on the other, it will be
necessary to move the generator shaft in one
direction or the other to balance the measurements.
Any movement of the shaft will affect the
clearances at the generator thrust bearing. It
may also affect the strain gage readings and the
setting of the flexible coupling. Additional movement, therefore, of the shaft, or the casing may
be necessary to bring about a balanced condition. A check should be made after every move
and steps taken to correct any offset condition
which may have been brought about by a previous move.
7. Movement of the generator casing, or
226
the shaft, will probably have some effect on the
generator air gap (the space between the armature windings and the pole pieces). The air gap
must be uniform around the diameter of the
armature. The clearance should be kept within
the limits specified by the manufacturer of the
generator. Air gap measurements are taken with
long thickness gages furnished for this purpose.
The gages are inserted between the armature
winding and each pole. When the air gap is
found to be greater at the top than on the bottom, the generator casing will have to be lowered by loosening the jacking screws located on
the side feet of the casing. If the gap is greater
at the bottom, the casing must be raised with
the jacking screws, and shims inserted between
the side feet and the pedestals.
Assuming that the shaft alignment has been
completed and is true, it will be necessary to
secure the rear foot of the generator casing to
the rear pedestal with a C-clamp. This will hold
the alignment of the shaft while the casing is
moved for adjustment of the air gap.
After attaining a balanced air gap, correct
shims should be installed. A complete recheck
of all clearances should be made to verify the
alignment installation. This check must include
another set of strain gage readings. Before this
final check, the generator casing should be
rigidly secured in position with a C-clamp to
prevent any possible movement of the casing.
11C4. Alignment of engine crankshaft with
two-bearing generator. This type of installation is typified by the GM generator set. The
GM engine is connected to the generator by
means of an elastic coupling. A procedure to
follow in aligning a generator to the coupling is
as follows:
1. Take strain gage readings to determine
the amount of crank cheek deflection. The maximum permissible deflection in a GM engine is
0.0035 inch. The measurement should be re-recorded for reference after completing the
alignment.
2. Check the engine crankshaft thrust bearing clearances with feeler gages. Clearance
should total approximately 0.030 inch, equally
divided on both sides of the bearing. If the
clearance is greater on one side of the bearing
than on the other, the crankshaft must be moved
in whichever direction will balance the clearances. This may be accomplished with a pinch
bar placed between the crank cheeks and the
engine framework. After clearances have been
balanced, the crankshaft must be blocked with
hardwood wedges placed between the crank
cheeks and the framework, to prevent movement of the crankshaft during the coupling
operation.
3. Determine the amount of fore-and-aft
movement of the elastic coupling. This measurement is made by placing the pointer of a dial
indicator against the face of the outer driving
disk of the coupling. The indicator may be secured to the upper half of the coupling housing
and the pointer should touch the driving disk
near the center. The coupling is then forced as
far forward or aft as possible, with a pinch bar,
and the dial indicator is set on zero. Make a
prick-punch mark on the face of the outer
spring holder in line with the jacking gear
pointer. Then force the coupling as far as possible in the opposite direction and make another
mark. The dial indicator reading denotes the full
fore-and-aft movement of the coupling, which
normally is about 0.0125 inch. In order to divide the coupling thrust evenly between the engine and the generator, the coupling must now
be moved to the center of its thrust or 0.0625
inch using the dial indicator as a guide. Make a
third prick-punch mark between the two previously made. This mark is the reference mark
used to check the center of the coupling thrust
after alignment has been completed.
4. Remove the outer driving disk from the
coupling and bolt it to the flange on the generator shaft. Check the amount of deflection of the
face of the disk with a dial indicator by turning
the generator armature one complete revolution. The deflection should not exceed 0.001
inch. Next, place the indicator pointer against
the rim of the disk, rotate the shaft one revolution, and check the amount of deflection. This
measurement should also be within 0.001 inch.
If the amount of deflection, on either the face
or the rim of the disk, is greater than 0.001 inch,
the condition may be corrected by loosening
the bolts and recentering the disk or by cleaning the inner surfaces of both disks.
227
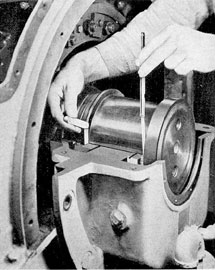
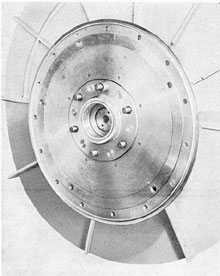
Figure 11-11. Elastic coupling, outer driving disk
removed, GM.
Figure 11-13. Mastic coupling, outer driving disk
mounted, GM.
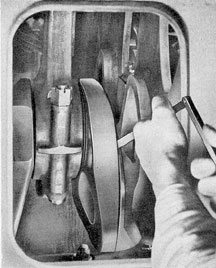
Figure 11-12. Elastic coupling, inner spring holder
removed, GM.
Figure 11-14. Elastic coupling, outer driving disk
mounted on generator, GM
228
After obtaining deflection readings within
0.001 inch, the bolts, the driving disk, and the
generator shaft flanges must be marked so that
they may be replaced in their respective positions when the generator is coupled to the
elastic coupling. Before removing the flange, the
dowel holes must be reamed for the body-bound
dowels. Dowels and dowel holes must also be
marked so that they will be replaced in their
respective positions.
5. Remove the driving disk from the generator shaft and reinstall it on the elastic
coupling.
6. Install the upper half of the elastic
coupling housing. Move the generator toward
the engine. Approximate axial alignment may
be attained with the jacking screws on the generator feet. Inboard and outboard alignment
may be attained by use of portable blocks and
jack screws working against the edges of the
generator feet. When an alignment as nearly
perfect as possible has been attained, the generator is moved farther toward the engine and
the generator shaft carefully inserted into the
bore of the driving disk.
Align the marked dowels with their corresponding dowel holes. If the generator is properly aligned, the dowels will slide into their
dowel holes. No attempt should be made to
force the dowels. If they cannot be inserted by
hand, the generator must be moved until perfectly aligned.
After installing the dowels, secure the
coupling to the generator shaft flange by installing the tap bolts.
7. Remove the generator thrust bearing
cap, then remove the bearing. Carefully inspect
and clean the bearing. Replace the lower half
of the bearing and check the thrust clearances
with feeler gages. The thrust should be evenly
divided between the two sides. If the thrust
clearance is greater on one side than on the
other, the generator housing must be moved
until a balanced condition is attained.
8. Remove the hardwood blocks securing
the crankshaft. Recheck the engine crankshaft
thrust bearing clearances and the setting of the
elastic coupling in relation to the center prickpunch mark. If either the bearing or the coupling has moved, the condition must be corrected by moving the crankshaft, the coupling,
or the generator. If any move is made, it will
be necessary to recheck the engine crankshaft
thrust, the coupling, and the generator thrust
bearing.
When all clearances are correct, a strain
gage reading must be taken and checked against
the recorded original reading. A change in the
strain gage reading indicates misalignment, a
condition which, at this point, can be corrected
only by moving the generator.
After perfect alignment has been attained,
measure the space between the generator feet
and the pedestals and install suitable shims.
Back off the generator feet jack screws so that
the full weight of the generator will be on the
shims. Another strain gage reading must then
be taken to check whether or not the shims
have affected the setting of the generator. If a
change is noted, it can be corrected by cutting
down or adding to the thickness of the shims.
If no change is noted, drill the dowel holes and
install the dowels; then drill the bolt holes and
install the bolts.
A final check is made by rotating the engine
with the jacking gear several revolutions in the
direction of rotation and then rechecking all
clearances. A slight variation in clearances, if
found at this time, is permissible.