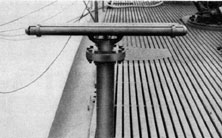
When a sound wave hits the
front of the hydrophone, the long
metal tube changes slightly in size.
This sets up an electric current in
wires coiled around its wooden
core. Sound cannot hit the back,
of the tube very strongly because
it is protected by a rubber bale.
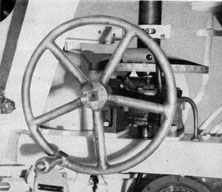
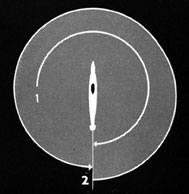
2. Training mechanism
The shaft on which the hydrophone is mounted goes down
through the pressure hull into the
forward torpedo room. Inside the
shaft a cable carries the electric
current to the amplifier. Geared to
the shaft is a training handwheel.
One full turn of this wheel turns
the hydrophone about 33 degrees. On the
circular scale, the target's relative
bearing is read opposite the pointer.
3. Amplifier
In the amplifier the electric current from the hydrophone is made stronger.
4. Headphones
By means of the headphones, or loudspeaker, the electric current from the
amplifier is changed back into sound. Thus the operator can hear and identify
sounds coming through the water.
Power supply. JP gets its power from the submarine's batteries. This
has two advantages: First, there is no generator to make noise during silent
running of the submarine. Second, even if depth-charge damage cuts off the
submarine's main power supply, the JP operator can still tell what is happening on the surface.
15
This is the way
16
the JP amplifier works
1st amplifier stage receives the incoming electric current from the hydrophone and makes
it stronger.
2nd amplifier stage makes this amplified current still stronger.
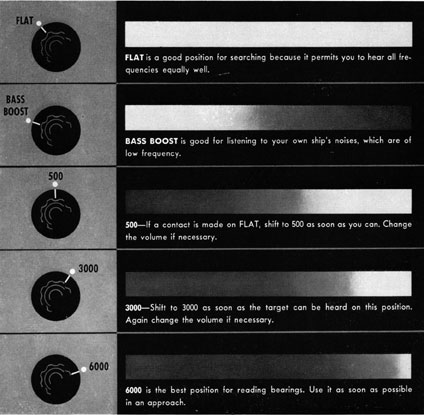
Bass-boost filter weakens
frequencies above 1500
cycles, making the low frequencies seem stronger.
Flat filter passes all frequencies equally well.
500-cycle filter cuts out frequencies below 500 cycles
it weakens frequencies from
500 to 2500 cycles, making
the higher frequencies seem
stronger.
3000-cycle filter weakens
frequencies below 3000
cycles, making the higher
frequencies seem stronger.
6000-cycle filter makes 6000
cycles stand out by weakening frequencies lower and
higher than this.
3rd amplifier stage makes the filtered current
stronger. How much stronger is determined
by the volume-control setting.
4th amplifier stage makes this amplified current still stronger.
Prop-count detector
changes the current so that
the propeller beats stand out.
Output amplifier stage makes the current
strong enough for the headphones.
Transformer changes the
current so that the loud
speaker can handle it.
Loudspeaker changes the
electrical current into sound.
Headphones change the
electrical current into sound.
Amplifier strengthens a small
portion of the current. How
much it is strengthened is
determined by the indicator
control setting.
Filter cuts out all frequencies
below 6000.
Rectifier changes the current
so that the indicator can
handle it.
Magic eye indicator lets the
operator's eye see what his
ears hear. The eye closes
when current is strongest.
17
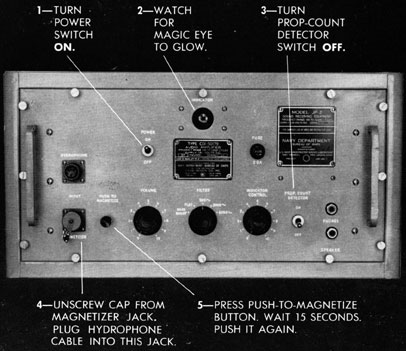
These are the steps to take
Power switch when ON, allows power to
be supplied to the amplifier.
Input jacks. When the cable is connected
to the hydrophone jack, the current from
the hydrophone goes into the amplifier.
When the cable is connected to the magnetizer jack, power from the amplifier can be
sent into the hydrophone, magnetizing it
to make it more sensitive.
Push-to-magnetize button sends the magnetizing power into the hydrophone.
Prop-count detector. Sometimes you can
get a better turn count with this ON.
Magic eye indicator. The eye closes when
the hydrophone is trained exactly on the
loudest sound.
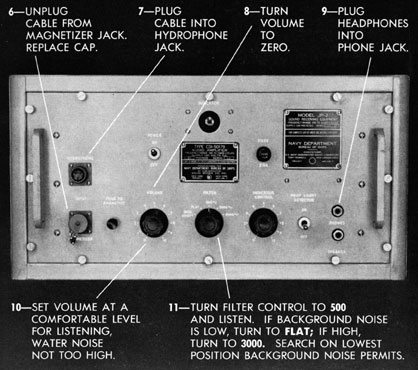
18
in starting JP sonic listening gear
Phones jack. Headphones are plugged in here for normal operation.
Speaker jack. If speaker is used, it is plugged in here.
Fuse. If a fuse burns out, your gear will go dead. Call the radio technician.
Volume control. As this is turned clockwise, the sound is made louder.
Filter control selects whichever of the five filters you want to use.
Indicator control. Turned clockwise, this increases the strength of the current going to the magic eye.
19
JP Search Procedures
When you are on sonar watch, until you get a contact, your time will
be spent in routine searching. To get the proper rate of sweep, you will have
to turn the handwheel rapidly. When you take over the watch, you first
carry out ...
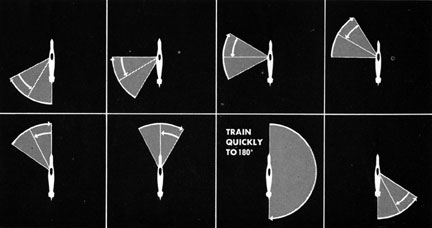
Rapid search
1. From the bearing at which
the hydrophone was left by the
previous watch, sweep through
000 degrees and continue on to 180 degrees.
2. Then, reversing direction,
sweep back around the full circle
to 180 degrees. If no suspicious sounds
are heard, shift to ...
Progressive search
Sweep forward two full turns of the handwheel and then one turn back.
Continue up the same side, two turns forward and one turn back, until you
have crossed the bow. Then train rapidly down the opposite side to 180 degrees.
Reverse direction and train two turns forward, one back, two forward, one
back, until you have crossed the bow again. Then train rapidly down the
other side ... and so on. Continue this procedure for the duration of your
watch, unless ordered to do otherwise.
20
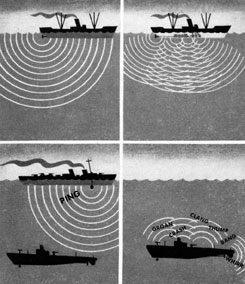
These are some of the sounds you are likely to hear
Report these sounds
1. Enemy ships' propellers
have rhythmic, swishing
beats. PT boats whine and
freighters chug.
2. Enemy ships' machinery
noise is not rhythmic like
propellers. For example,
generators sound just as you
would expect.
3. Enemy echo-ranging
(pinging) produces dull
thuds or sometimes shrill
peeps on JP.
4. On your own submarine,
electric motors have a smooth
hum; bow planes grate; the
TDC whirrs; blowing tanks
make a roaring sound.
The only way to learn to know these sounds is to listen to them repeatedly
on the JP training records. Every submarine has these records.
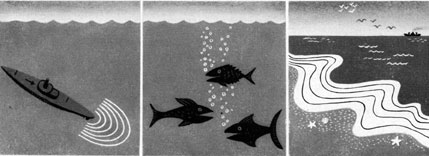
Learn to recognize these other sounds
1. Own ship's screws are heard at 180 degrees, except during silent running.
2. Shrimp snap; porpoise bark and whistle; drumfish sound like a drum;
croakers croak.
3. The roaring pound of surf against a beach sounds quite natural.
21
Contact !
When your searching picks up a suspicious sound, your real job begins.
The conning officer needs all the information you can give him. Here is what
you must do - and do quickly.
1. Check the reciprocal bearing
Suppose you pick up a contact when the hydrophone is trained on 090 degrees.
Immediately train halfway around the bearing circle to 270 degrees. If the sound
is weaker here, then you know 090 degrees is the correct contact bearing. But if the
sound is stronger on 270 degrees, then 270 degrees is the right bearing to report, because
the sound you heard on 090 degrees came through the baffle at the back of the
hydrophone.
2. Report the contact
Immediately give the approximate bearing: "JP, contact, bearing ze-ro
niner ze-ro." If you are not sure it is a ship, report: "JP, doubtful contact,
bearing ze-ro niner ze-ro."
3. Adjust the amplifier controls
While you are reporting, set your amplifier controls to sharpen the
target sound:
1. Set volume low enough to make the target distinct from
the background noise.
2. Turn filter to the highest setting on which the target can
still be heard.
3. As soon as you can hear on the 3000-cycle position, adjust
the indicator control so that the magic eye just closes
as the hydrophone is swung across the target.
4. Keep reporting accurate bearings
Make your eyes and ears work together. Use both the magic eye and
the sound from your headphones to get the best bearings you can. Report
every bearing you read. Keep adjusting your volume and filter controls to
narrow the arc of the target.
5. Identify the target
As soon as possible, decide the probable kind of target. If it is a ship,
notice the speed of the screws (slow, medium, or fast) and the weight of
the sound (light or heavy). Report the nature of the target: "JP, bearing
two eight eight. Sounds like a destroyer."
6. Keep information going to the conning tower
Get the turn count. Watch for any changes in the speed of the screws
or in the loudness of the sound. Report every fact right away.
22
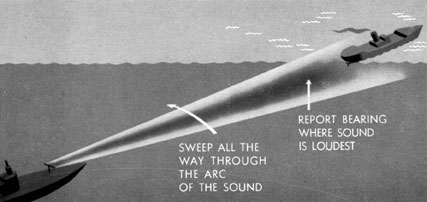
How to get accurate bearings
Read when sweeping from target's bow through target's stern
To get good bearings and to avoid losing contact, keep crossing the
target. Sweep all the way through the screw noise. Then sweep back. Sweep
all the way through again and all the way back. Determine which way the
target is heading as quickly as possible. Then read the bearing only when
sweeping in one direction: from the target's bow through the target's stern.
Continue to sweep and to report bearings every time you cross the target in
this one direction.
Read the bearing at maximum loudness
As you sweep across the target, the propeller noise increases to maximum loudness, and then dies away. There is also a change in the nature of
the sound. Near the bearing of the propellers it has more of a hissing quality. With some experience, you will learn to combine the change in loudness
and the change in quality to pick out the maximum point accurately.
If the sound is of equal loudness over a wide arc, proper use of the gain
and filters will nearly always narrow it enough to give you a distinct maximum. Also, the more rapidly you sweep, the more noticeable the changes
become - and the more accurately you can determine the peak.
Use the magic eye
The eye can be brought into operation as soon as you are able to listen
on the 3000-cycle filter position. Adjust the indicator control until the eye just
closes on each sweep through the target. Read the bearing the instant the
eye closes. This should check with the bearing obtained by listening. When
ever you change the volume setting, you may have to reset the indicator
control.
23
Use volume and filters wisely
Low volume narrows the target.
As soon as you get a contact, turn the volume control to the lowest setting at which the target can be heard. By cutting down the background noise
level, this makes the propeller sounds stand out more clearly. With low volume, the arc of the target noise narrows. This allows you to get more accurate bearings.
Filters can define and narrow the target
Propeller noise is made up of all frequencies. But background noise, from
the water and the submarine, is mostly low-frequency sounds. Therefore, by
operating with a high-frequency filter you can get rid of the background
noise, yet still hear the screws. Also at higher frequencies the target is heard
over a narrower arc. So it is wise to use the highest filter setting on which
the target can be heard.
24
How to take a turn count
1. Train the hydrophone directly on the bearing where the prop beats
are loudest.
2. Turn the prop-count detector ON. It may bring out the beats more
clearly. (If it does not, turn it OFF.)
3. Notice whether the beats are accented or unaccented. Accented beats
go CHUG, chug, chug (three-bladed propeller)-or CHUG, chug, chug, chug
(four-bladed propeller). Unaccented beats go chug, chug, chug, chug, chug.
4. Get in rhythm with the beats by pumping your arm up and down.
If there is an accented beat, let your hand come down with every accented
CHUG -or if the beats are all the same, on every chug.
5. Count the number of times you pump your hand down in 15 seconds.
6. Multiply this count by 4 to get the number of rpm (revolutions per
minute). Report the rpm immediately. For example, if your 15-second count
is 24, the rpm will be 96, and you will report: "JP, turn count is ze-ro nines six.
Good count." If the beats are so rapid that you are not sure of the accuracy of
your count, report: "Poor count."
7. After you have reported, make sure that the prop-count detector
switch is OFF.
During approach and attack
Give the conning officer every scrap of information you can about the
target. Be alert to catch and report:
. . . if it changes its course, turn count, or pinging rate.
. . . if it crosses your own bow or stern.
. . . if another ship comes between you and the target.
. . . if you lose contact.
Listen carefully to all orders from the conning officer. He may direct
you to track the target. Or he may tell you to continue searching all around
to keep in touch with the escort vessels in the screen, while another sonar
operator stays on the target. If he fires torpedoes, he may order you to track
them-to give bearings continuously on their whining sound as they run, and
to report the crash as they explode.
25
During evasive maneuvers
In escaping from the enemy, the JP gear is frequently used to keep track
of the attacking ship. Because of its topside mounting it can be operated even
when you are lying on the bottom. It is also valuable for detecting telltale
noises your own machinery may be making, using the bass-boost filter to
bring out the low frequencies. If a doubtful sound remains on the same bearing when your own ship changes course, it is almost certainly from your own
machinery. You should study our own ship's sounds so that you learn to
recognize them quickly.
After depth charges - remagnetize
If depth charges are dropped near you, you probably will have to remagnetize the hydrophone. Plug the cable into the magnetizer jack, and
press the push-to-magnetize button just once. Then plug the cable into the
hydrophone jack and listen. If you cannot hear anything, magnetize the hydrophone again. Continue this procedure until the hydrophone is able to
pick up sounds.
Securing JP gear
As soon as your submarine surfaces, secure the JP gear,
1. Turn the power switch off.
2.Train the hydrophone to 090 degrees if it is installed on the port side, or to
270 degrees if it is on the starboard side.
3. Hang up the headphones carefully. They are a special kind that cannot be replaced while you are on patrol. Other headphones do not work as
well on JP gear.
Enemy echo-ranging
If in searching you hear the dull thuds or shrill peeps of
enemy pinging (echo-ranging), quickly check the reciprocal
bearing, and then report the approximate bearing of the pinging
immediately. Estimate the time between pings. If it is over 2
seconds, report "long scale." If it is definitely less than this, report
"short scale." Be alert to catch and report any change in the
pinging rate.